

Getting greeted with an 0xE800000A error code whilst connecting your Apple device to iTunes?
iTunes is a great companion for Apple users in managing content on their devices. However, there are occasions where problems occur, and it can be a little annoying, especially if you need to move or copy media files to your Apple device.
There have been several reports from users who are experiencing connection problems with a 0xE800000A error code when they try to connect their device using the lightning cable. On the other hand, users have also reported experiencing this error code when they try to restore a previous backup from an old device to a new one.
Now fret not, as this problem can be fixed if you know the right solutions. Lucky for you, you have come to the right place. Today, we are going to show you a few techniques that you can do to try and fix the iTunes error 0xE800000A code which we’ve found to be effective.
Let’s get started.
- 1. Restart Your Computer.
- 2. Check Your USB Cable.
- 3. Use Another USB Slot.
- 4. Update iTunes.
- 5. Update Your iOS Device.
- 6. Disable Third-Party Antivirus Software.
- 7. Reset Location & Privacy Settings on Your iOS Device.
- 8. Reset Lockdown Folder.
- 9. Reinstall iTunes on Your Computer.
1. Restart Your Computer.
When programs on your computer are not running properly, the first thing that you should do is to restart your operating system.
It is possible that some of its system files did not load properly or it encountered a temporary glitch while running, which caused the error code on iTunes.
To rule this out, you can try restarting your computer so that the operating system has a fresh start.
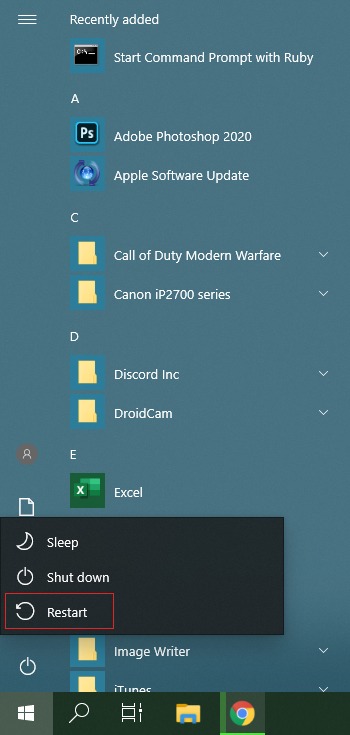
- On your keyboard, press on the Windows key to open the Start menu.
- Next, click on the Power button on the Start menu to open the Power Options menu.
- Lastly, hit the Restart button to begin the rebooting process of your operating system.
Wait for your computer to complete rebooting, then run iTunes once again and try connecting your Apple device to see if the 0XE800000A error code would still appear on your computer.
However, if the issue still occurs when connecting your Apple device, you can proceed to the next method below to try and fix the problem on iTunes.
2. Check Your USB Cable.
If the error on iTunes occurs when you try to connect your Apple device, then you can try checking the USB cable that you are using.
USB cables contain separate wires for delivering current for charging and data for your computer to read. It is possible that your cable still works perfectly for charging, but not for transferring data.
To verify this, you can try checking for any physical damage on the wires. See if there are any exposed wires, then inspect the actual USB connector and lightning connector for any damages.
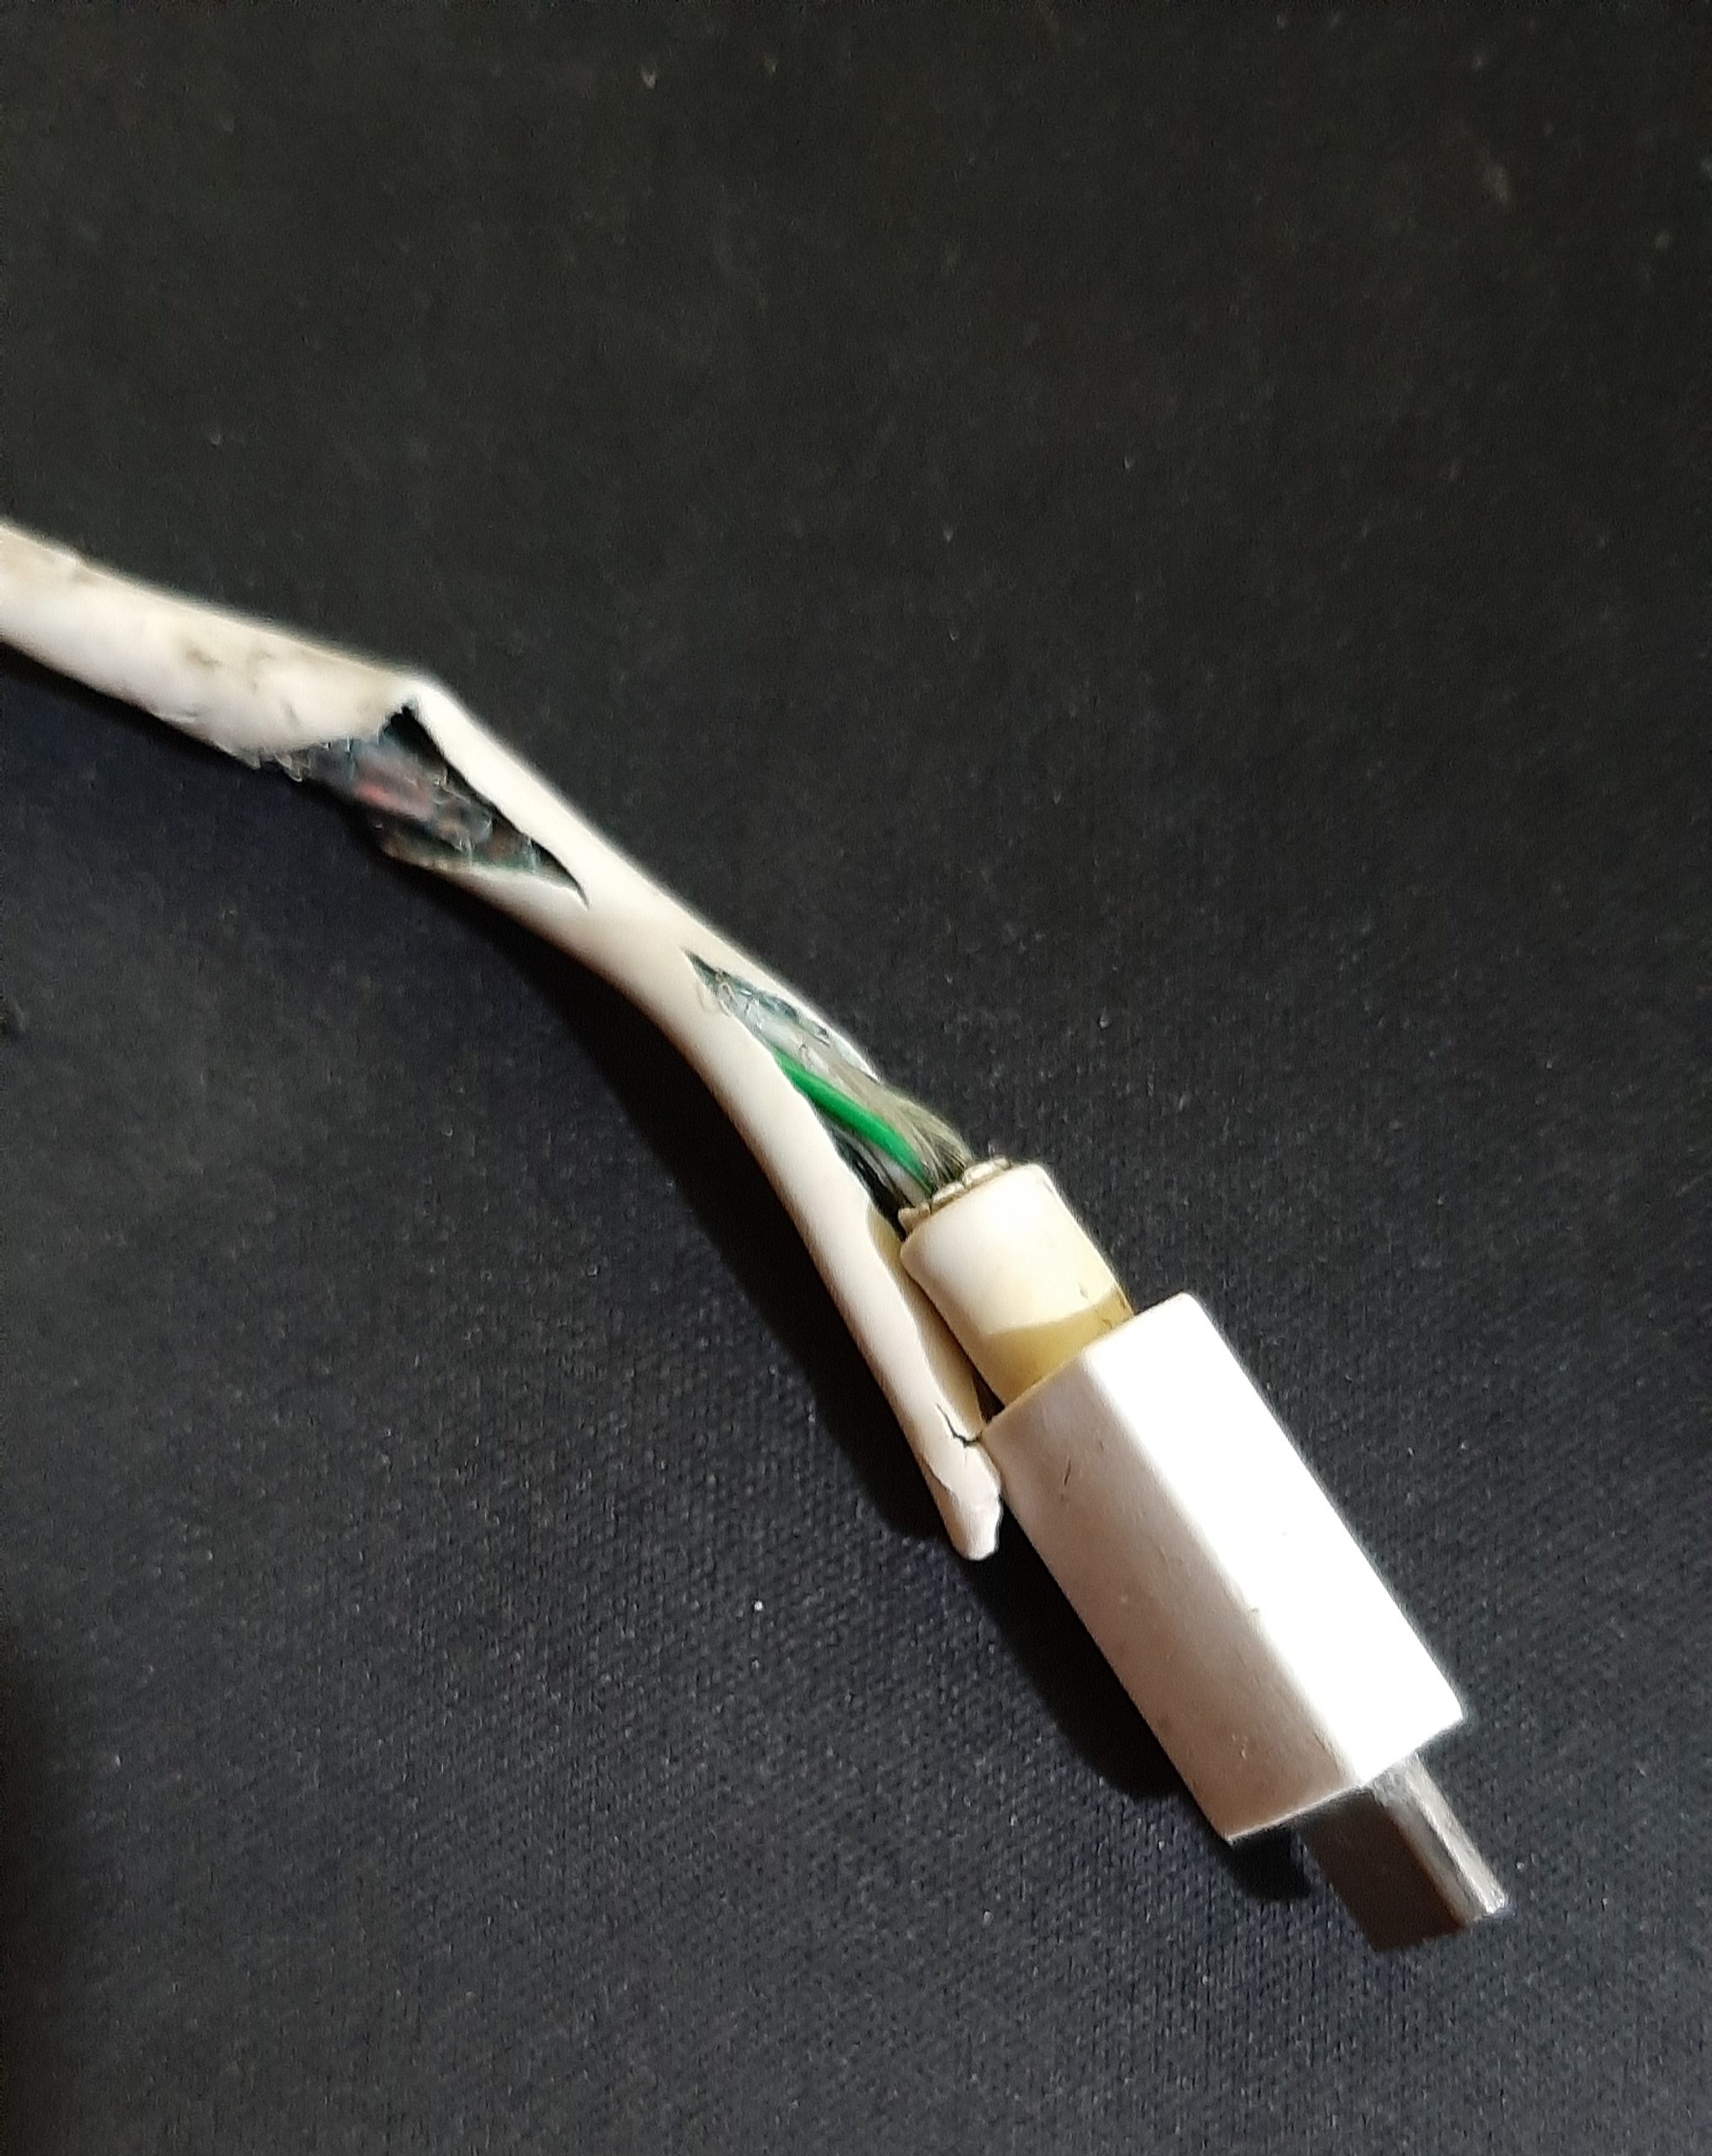
Another great tip that ended up fixing the solution for us was to use another USB cable to see if the error code would still occur on your computer.
3. Use Another USB Slot.
After checking your USB cable for any damages, you can try using a different USB slot on your computer to see if the error code 0xE800000A would still occur.
It is likely that a specific USB port on your computer is not working properly or your device’s drivers were not installed correctly.
Hence what you can do is unplug the USB cable from the port and try connecting it to other ports on your computer. Repeat the process until you tested all the ports on your computer.
Also, try to use the USB ports from the back of your motherboard instead of the ports on your computer case’ front panel. Front panel ports carry out less voltage which may not be enough for your Apple device compared to the USB ports at the back of your motherboard.
4. Update iTunes.
If you are sure that none of the physical connections on your computer is the cause of the error, then the next thing that you should do is check for an update on iTunes.
Running an outdated version of iTunes which your device no longer supports or your current version can contain bugs that cause the 0xE800000A error code. Chances are by the time you’re reading this post that Apple may have released newer versions of iTunes to address this matter.
To check for an update on iTunes, you can follow the steps below:
- On your Desktop, double-click on the iTunes icon to launch the program.
- After that, click on the Help tab on the menu bar located at the top of your screen.
- Lastly, click on the Check for Updates button, and it will automatically search for any updates available for the current version of iTunes installed on your computer.
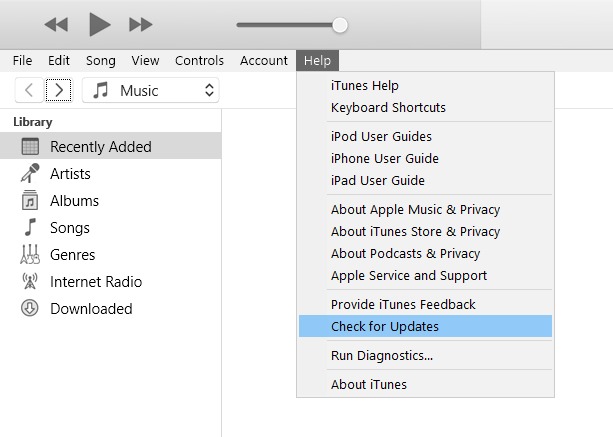
If available, follow the on-screen prompts to download and install the update. Now, after updating iTunes, try connecting your Apple device once again to see if the 0xE800000 error code is already fixed.
5. Update Your iOS Device.
After updating iTunes, the next thing to do is to update your iOS device. In this case, the issue may be the other way around, and your iOS device is the one that is outdated and not supported by iTunes, which causes the problem.
In this case, you can try updating your device by doing the following steps below:
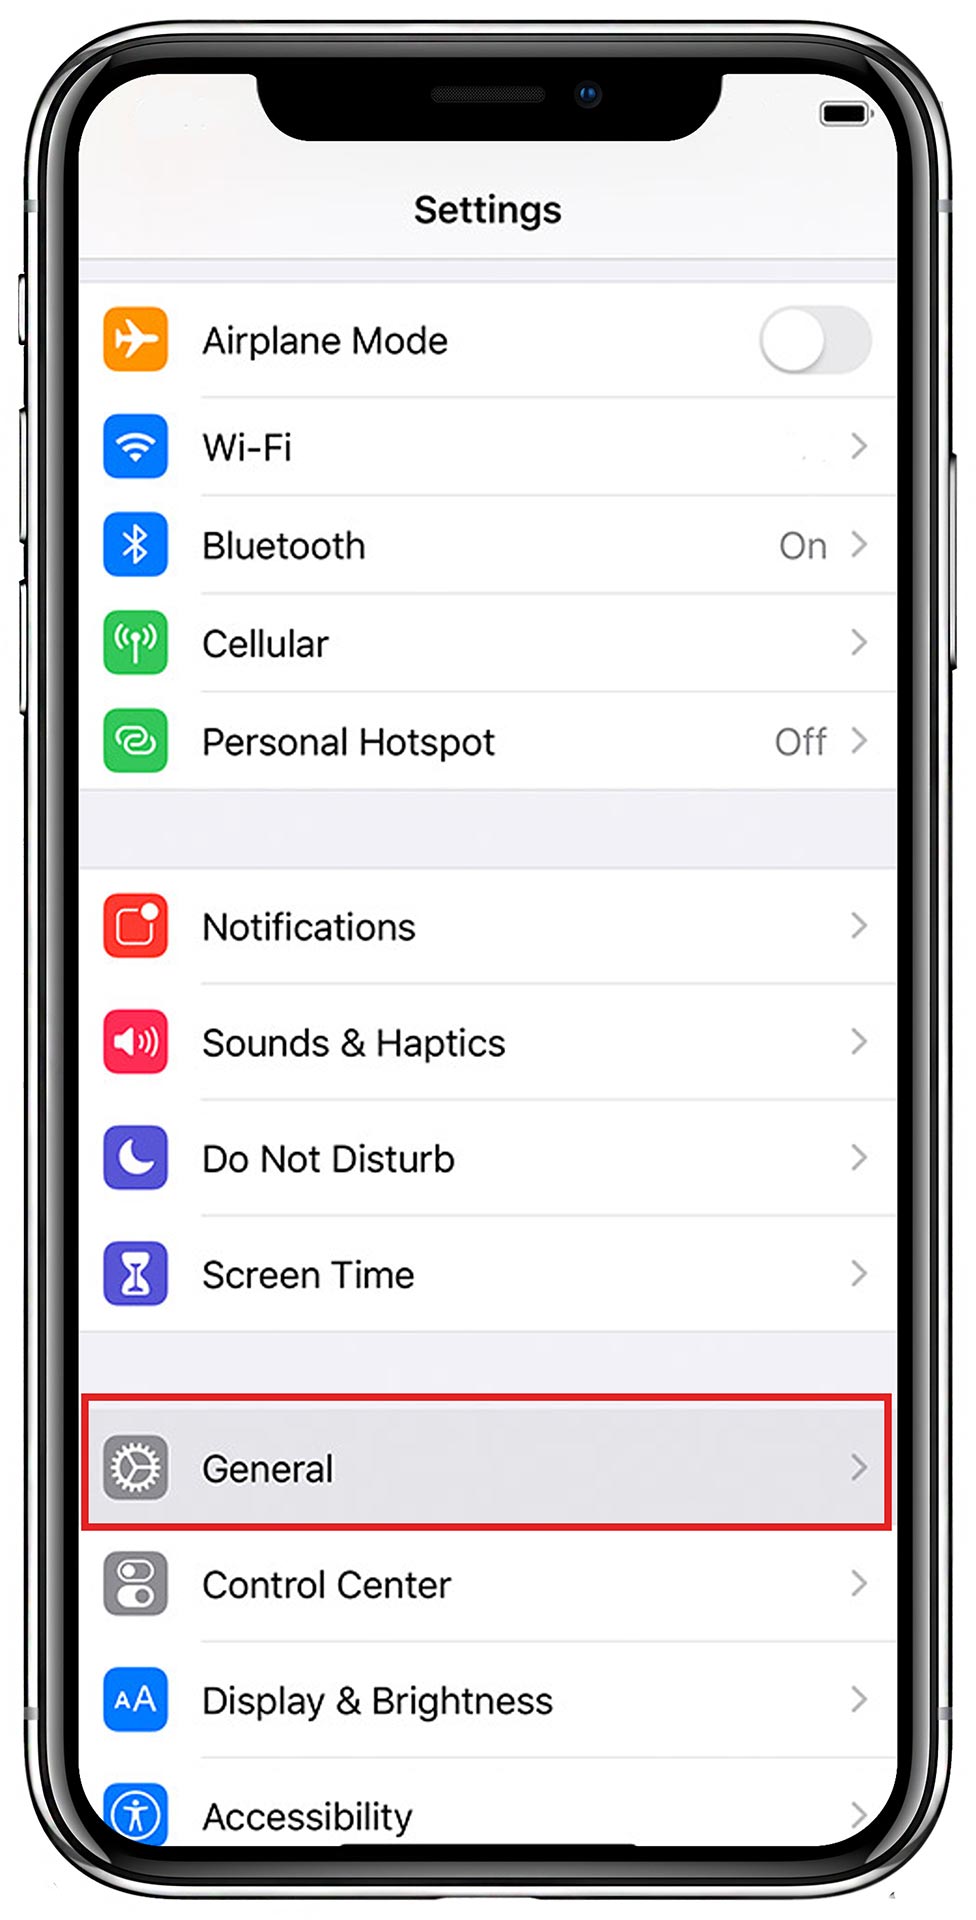
- On your iOS device, go to the main screen and tap on Settings to open it.
- Next, inside the Settings, tap on the General tab.
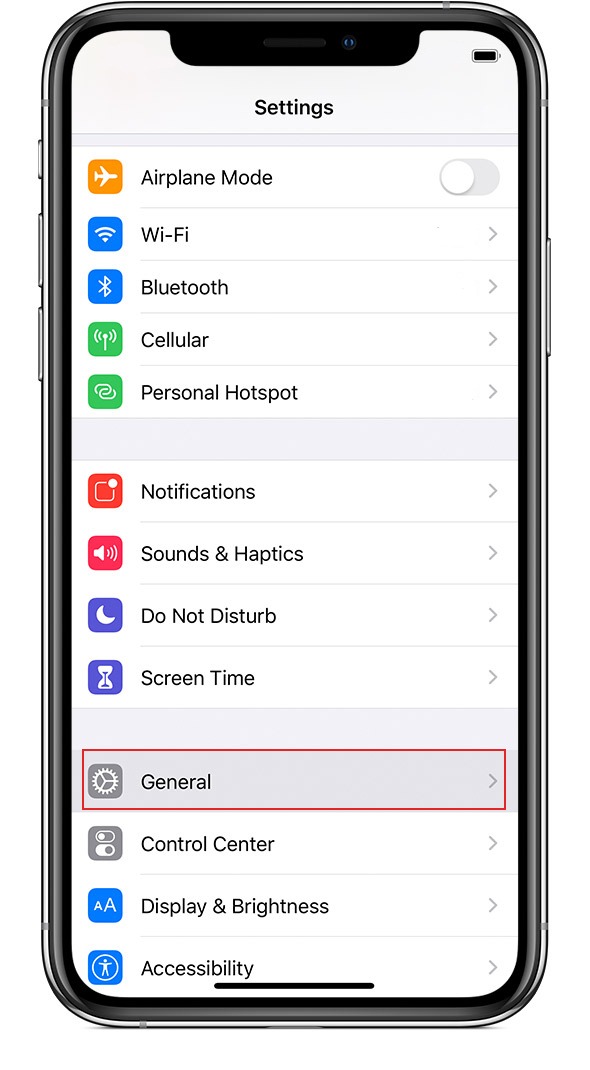
- Lastly, tap on Software Update. Your device will start checking for any update available for the current version of iOS installed on your device.
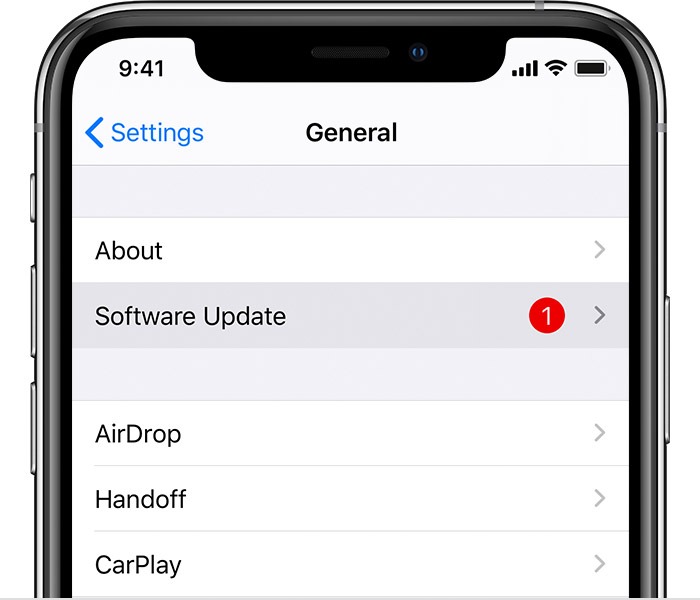
If available, you can follow the on-screen prompts on how to download and install the update to your iOS device. Once the update is done, connect your device to your computer and see if the error code 0xE800000A would still occur on iTunes.
On the other hand, if the problem still occurs, you can try doing the next method below to try and fix the issue.
6. Disable Third-Party Antivirus Software.
Antivirus software can also be the cause of the 0xE800000A error on iTunes when you try to connect with your Apple device.
Oftentimes, antivirus software can flag your device as suspicious whenever it doesn’t recognize it.
The workaround for this is to temporarily disable your antivirus software when you are connecting your device to your computer to prevent it from interfering with the connection from your device to iTunes.
Although there is only a small chance of this scenario from happening, it wouldn’t hurt to try it out.
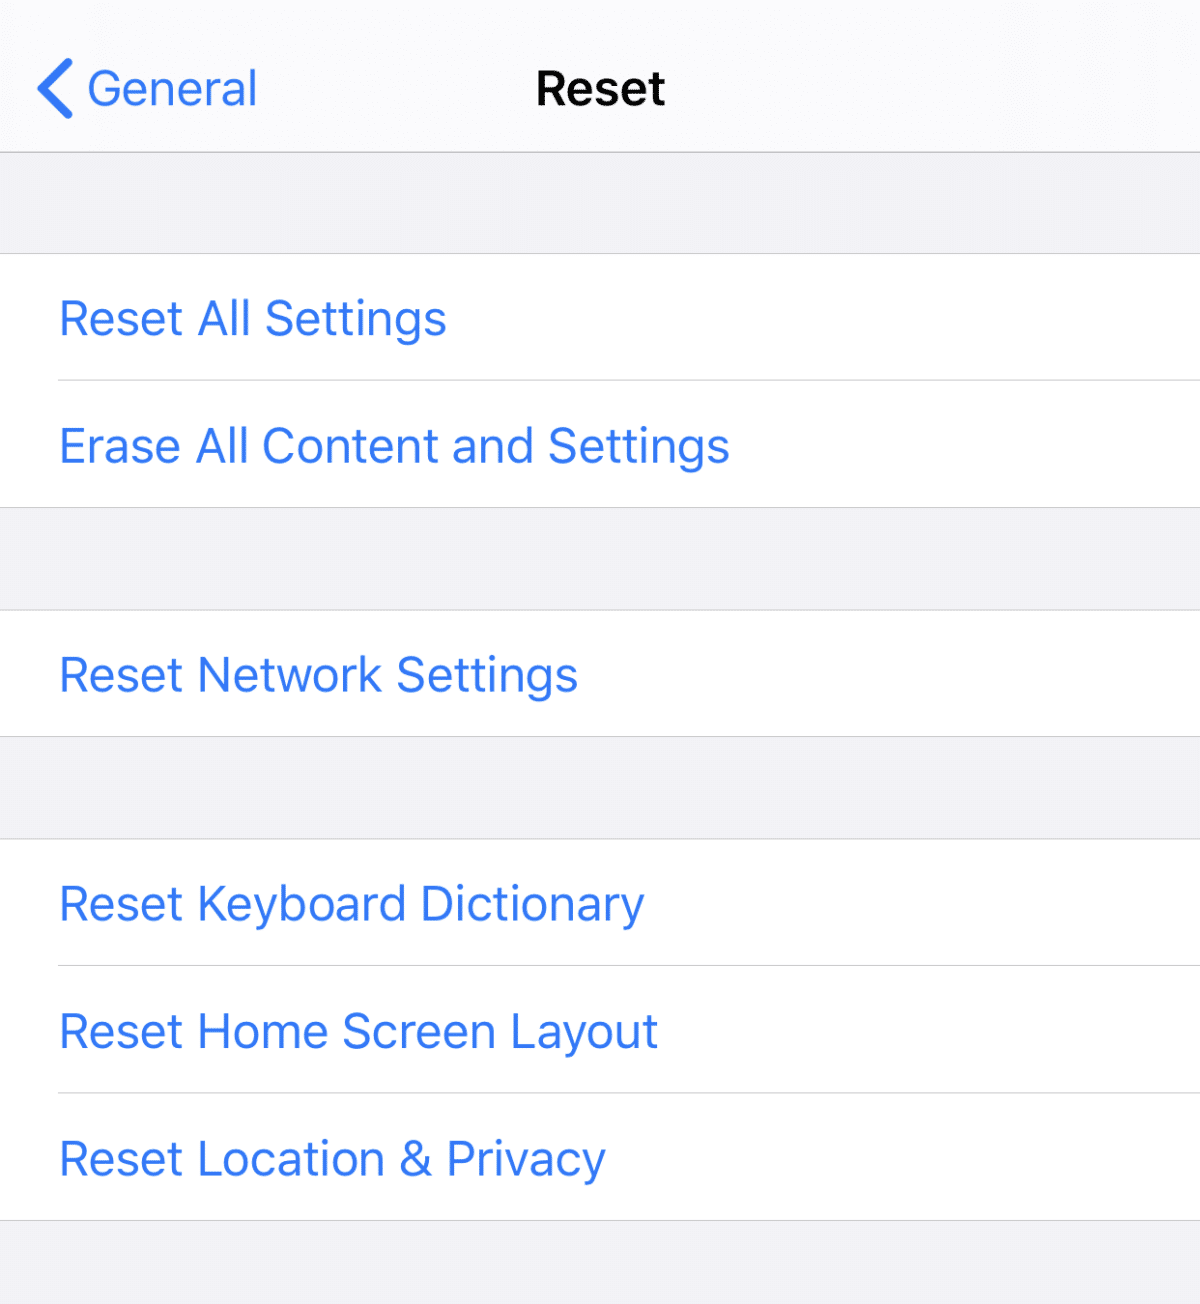
7. Reset Location & Privacy Settings on Your iOS Device.
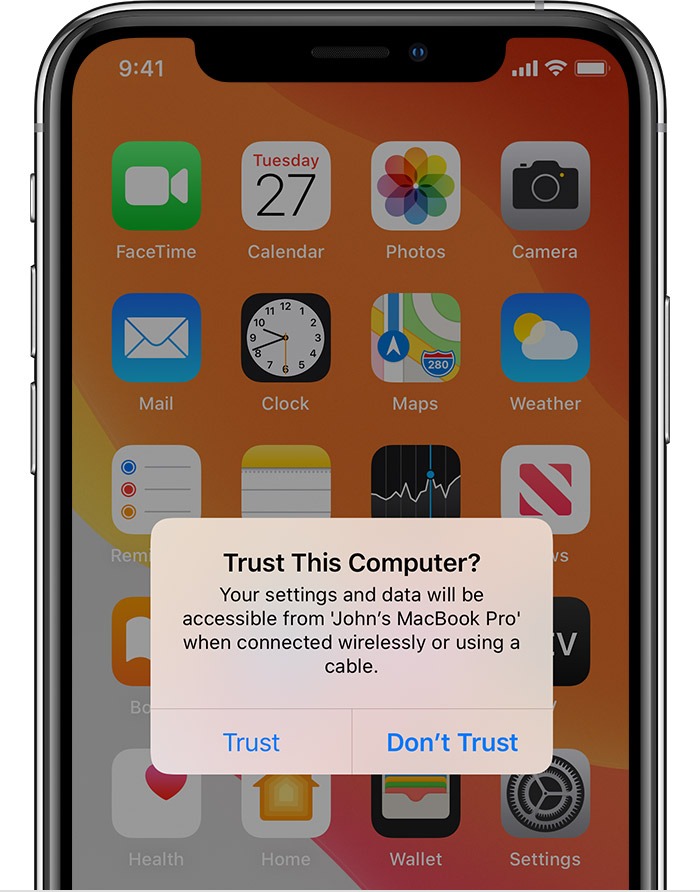
The next thing that you can do to try and fix the 0xE800000A error on iTunes is to reset the ‘Location & Privacy’ settings on your iOS device. You may have mistakenly hit the ‘Don’t Trust’ prompt on your iOS device which blocks any form of connection to your computer.
To rule this out, you can try resetting your Location & Privacy settings by following the steps below:
- Open the Settings app on your iOS device.
- After that, click on the General tab inside the Settings main menu.
- Next, scroll down and tap on the Reset tab.
- Lastly, click on Reset Location & Privacy and tap on Reset Settings when a prompt pops-up.
Wait for your iOS device to complete the process, then try connecting it to your computer once again to see if the 0xE800000A error code would still occur on iTunes.
If you are prompted once again with the ‘Trust This Computer’ on your Apple device, then make sure to choose the Trust option.
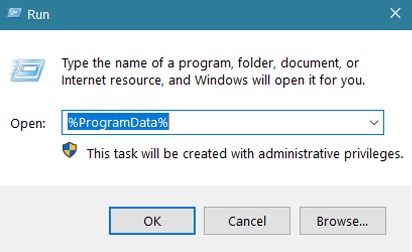
8. Reset Lockdown Folder.
iTunes creates a subfolder on your computer’s hard drive, which is used to store essential security files for communicating with Apple devices that are connected to your computer.
It is possible that the files related to the Apple device that you are connecting got corrupted, which causes the connection problem between your device and iTunes.
To fix this, you can try resetting the ‘Lockdown’ folder on your hard drive. Check out the steps below to guide you through the process:
- On your computer, press on the Windows key + R to open the Run Command Box.
- After that, type %ProgramData% and hit Enter to open the Program Data folder on your computer.
- Next, find the folder named Apple from the list and open it.
- Inside the Apple folder, right-click on the Lockdown folder and click on Rename.
- Lastly, rename the Lockdown folder to Lockdown.old.
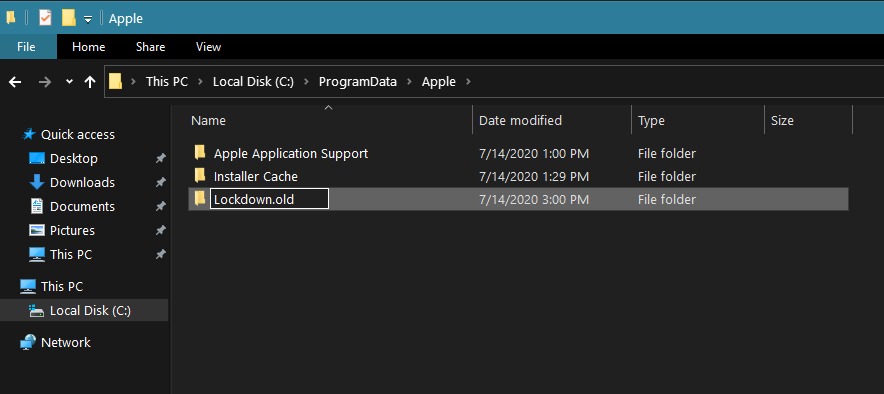
Now, open iTunes once again and try to connect your iOS device to see if the error code 0xE800000A would still occur on your computer.
However, if the issue still occurs on iTunes when you try to connect an Apple device, then you can proceed to the last method below to try and fix the problem with iTunes.
9. Reinstall iTunes on Your Computer.
The last thing that you can do to try and fix the problem with iTunes is to reinstall the whole program on your computer.
In this case, it is best that you remove the iTunes program on your computer and install it back again so that you are sure that you have a working copy of the program on your computer.
We will show you step-by-step on how to reinstall iTunes on your computer, below:
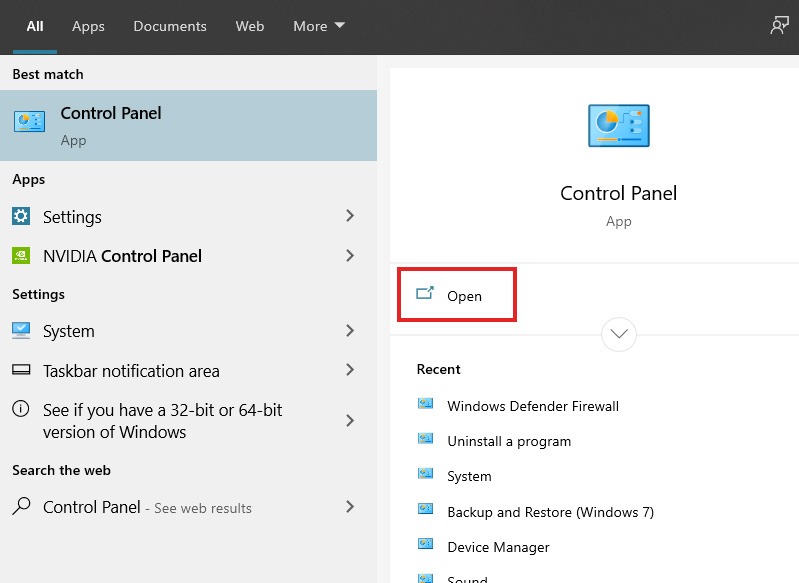
- First, press on the Windows key + S on your keyboard and search for Control Panel.
- Next, click on Open to launch the Control Panel.
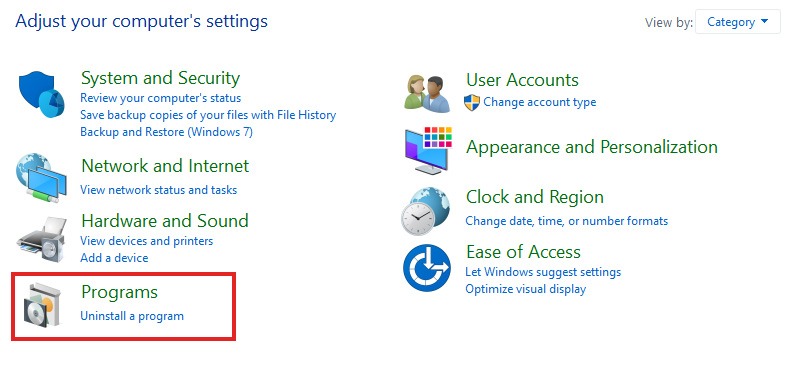
- After that, click on Uninstall a Program.
- Lastly, find and right-click on iTunes from the list of programs installed on your computer and select Uninstall.
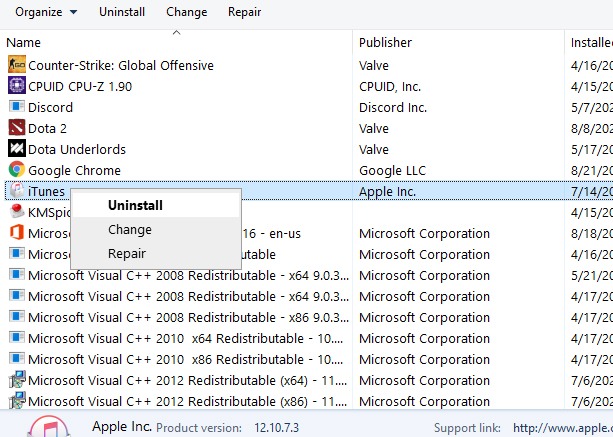
Follow the on-screen prompts to remove the program on your computer. Now, restart your computer and go to Apple’s official website and download the latest version of iTunes to your computer.
This ends our guide on how to fix iTunes 0xE800000A error code on your computer. If you know other methods that you’ve found helpful besides the ones listed in this article, kindly share it in the comment section below, and we would give you credit for the solution once this article gets updated. 😀
If this guide helped you, please share it. 🙂