

Wondering why you have greyed out songs on Apple Music?
Apple Music has over 100 million songs in its library. Unfortunately, not all titles can be enjoyed by users.
If you go over Apple’s community page, you’ll see dozens of threads about greyed out songs on Apple Music.
This issue is usually caused by iCloud sync issues. However, it can also be due to DRM (Digital Rights Management) issues or removed content.
If you’re experiencing this, we’ll show you what to do if you have unavailable songs on Apple Music.
Let’s get started!
1. Check Apple Servers.
Before changing your configurations, make sure that the problem is not caused by server outages.
To do this, visit Apple’s system status page and see if there are ongoing issues with Apple Music.
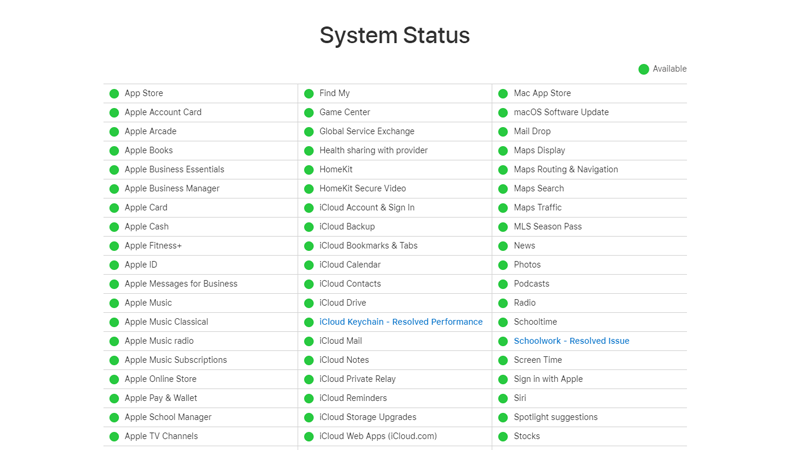
If the servers are down, the only thing you can do is wait. On the other hand, you can head to the next solution if there’s nothing wrong with Apple’s servers.
2. Restart Your Device.
You can try restarting your device if you see greyed out songs on Apple Music. This should reload your system resources, ensuring that the issue is not caused by temporary errors.
Restarting your device should also clear corrupted data from the system memory.
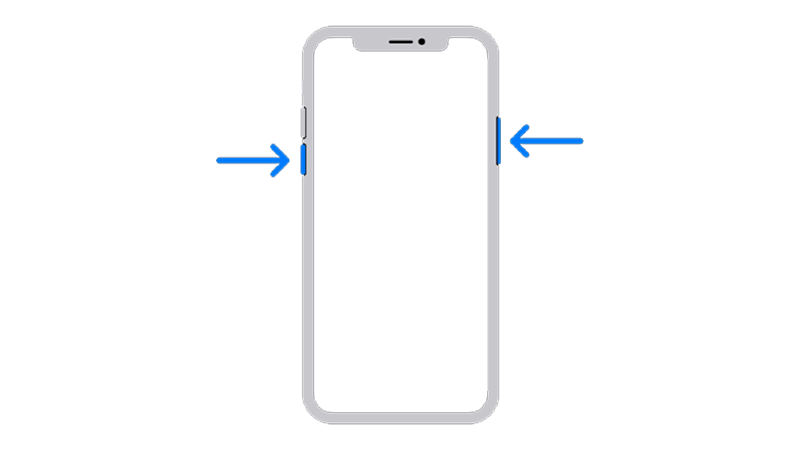
If you are using an iPhone X, 11, 12, 13, 14, or later, here’s what you need to do:
- Hold down the Volume Down button and Side button until the ‘Slide to Power Off’ prompt appears.
- Now, drag the slider to the right and wait for 30 seconds.
- Press the Side button afterward to turn on your device.
For older iPhone models, follow the steps below:
- Locate the Power button on your device.
- Now, hold the button until the ‘Slide to Power Off’ prompt shows up.
- Drag the slider to the right and wait 30 seconds before turning on your device.

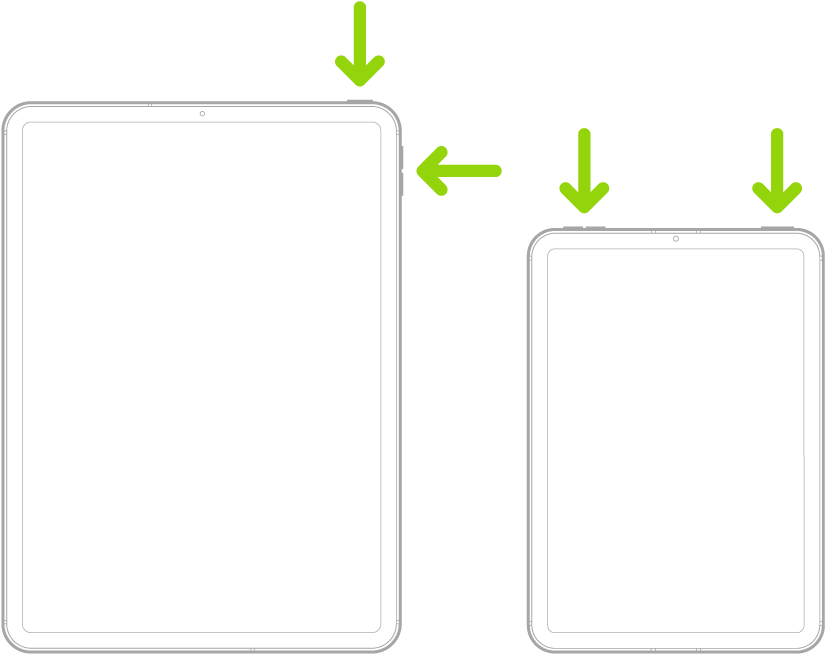
For iPads without a home button:
- First, press and hold either the Volume button + Top button until the ‘Slide to Power Off’ prompt appears.
- Now, drag the slider to the right until your display shuts off.
- Lastly, wait for at least 30 seconds before turning on your iPad.
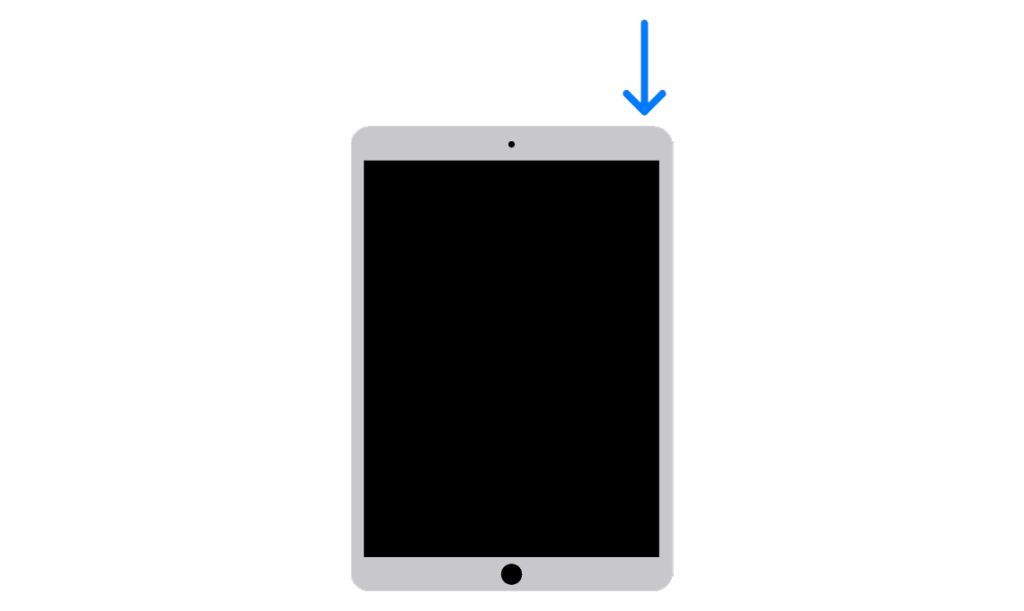
For iPads with a home button:
- On your device, press and hold the Top button until the power slider appears.
- Drag the slider to the right until your display turns black.
- Finally, wait for at least 30 seconds before restarting your iPad.
Go back to Apple Music to check if the problem is solved.
3. Check Your Network Connection.
If you stream songs on Apple Music, you’ll need a stable connection to avoid problems.
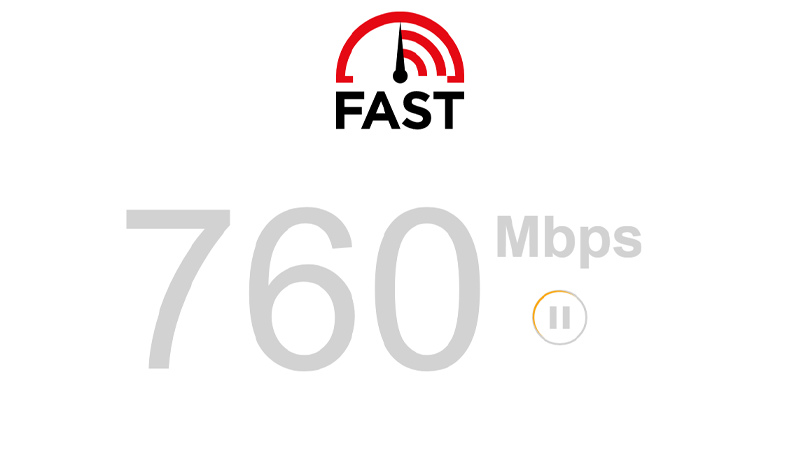
To check if your network is the culprit, perform a speed test using Fast.com to measure its current bandwidth.
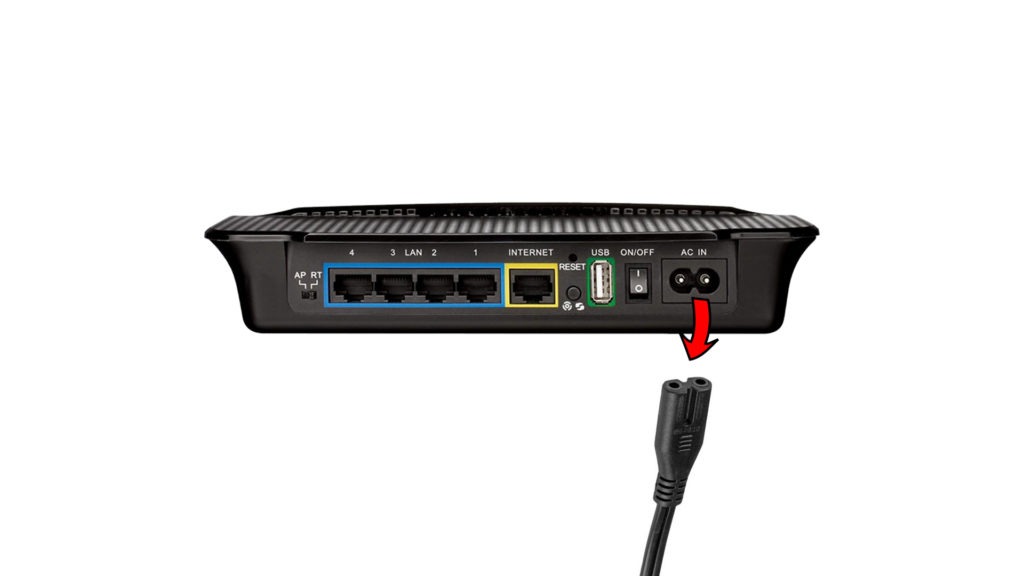
Power cycle or restart your modem if the result indicates a problem with your network to refresh the connection with your ISP’s servers.
- Disconnect your router’s power cable from the outlet.
- Wait for 5 to 10 seconds.
- Reconnect your router’s power cable and wait for it to initialize.
Run another test afterward to check if the problem is solved. If not, contact your provider and ask them to fix their service.
4. Update Your Device.
Faulty versions of iOS or iPadOS can also cause this problem on Apple Music. Check if there are available updates for your device and install them to patch potential bugs and errors.
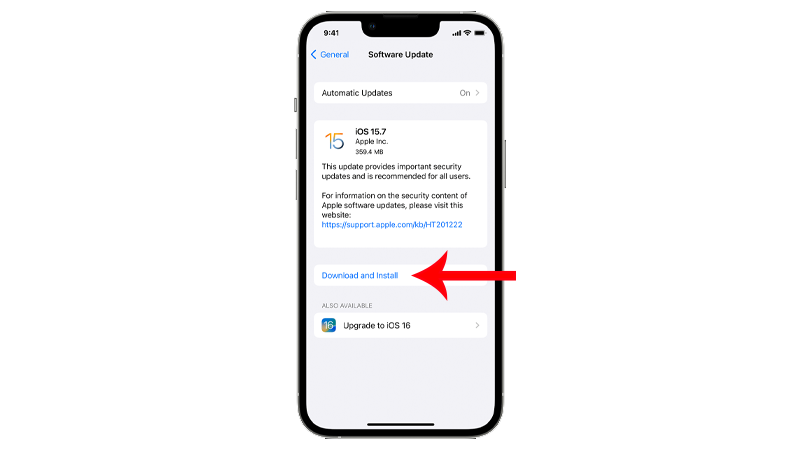
If you’re using an iOS device, here’s how you can update it:
- Launch Settings on your device.
- Now, tap on General > Software Update.
- If there’s an available update, tap on Download and Install.
Note
- Your device can restart several times while installing the update.
- Make sure that your iPhone has at least 50% battery before installing updates. It’s best to keep your device plugged into the wall charger to avoid interruptions.
- Allow at least 15 minutes for the update to install, especially if it’s a major update (iOS 14 to iOS 15).
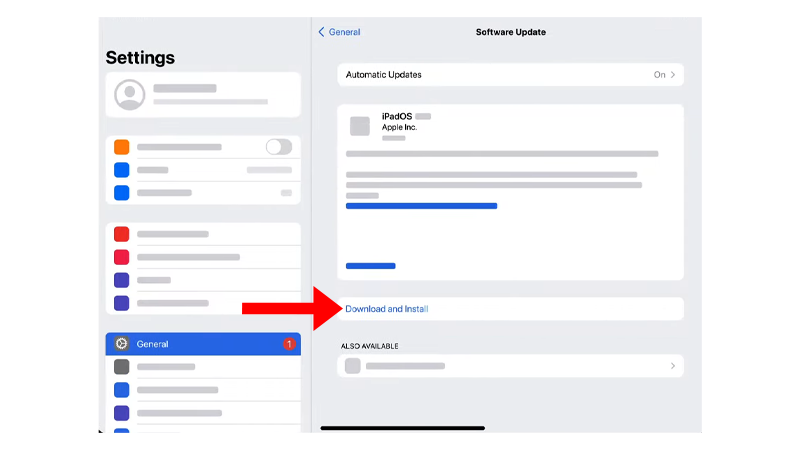
For iPad users, follow the steps below:
- Open the Settings app on your iPad.
- After that, go to General > Software Update.
- Finally, go to Automatic Updates and enable all the options under it. Head back to the previous page and tap on Download and Install.
Note
- Your device can restart several times while installing the update.
- Make sure that your iPad has at least 50% battery before installing updates. It’s best to keep your device plugged into the wall charger to avoid interruptions.
- Allow at least 15 minutes for the update to install, especially if it’s a major update.
Once done, go back to Apple Music to check if the problem is solved.
5. Delete the Greyed Out Song.
For some users, removing and adding the greyed out song solved the problem.
An error might have occurred while syncing your Apple Music library, and some songs were not downloaded properly.
Here’s what you need to do:
- Open Apple Music on your device.
- Now, go to Library and access the Downloaded tab.
- Look for the song you want to remove.
- Press and hold the song and tap Remove.
- Confirm your action by tapping Remove Download or Delete from Library.
- Restart Apple Music and add the song to your library.
Observe if the song will go back to an unavailable state after a while.
6. Allow Apple Music to Use Cellular Data.
If you are not connected to Wi-Fi, check if Apple Music is allowed to use cellular data. You won’t be able to stream music from the app if it doesn’t have access to the internet.
Note
Streaming songs using cellular data can consume your monthly allotment, and extra charges may apply.
Follow the steps below to allow Apple Music to use cellular data:
- Open Settings on your iPhone.
- Scroll down and tap on Music.
- Under ‘Allow Music to Access’, enable the Cellular Data option.
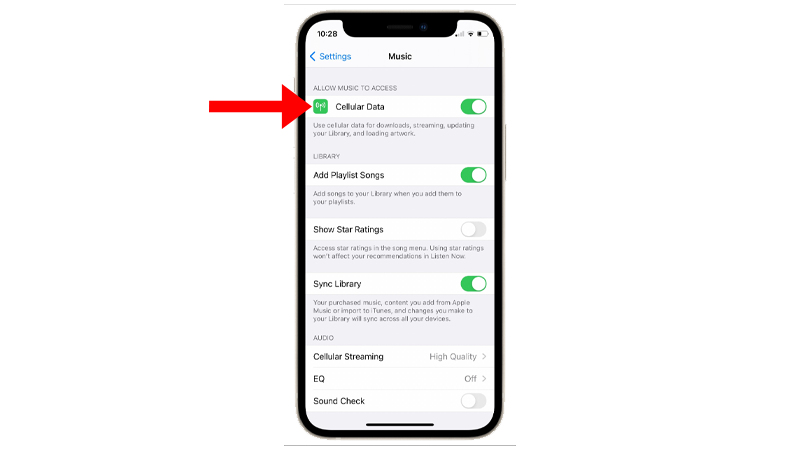
Once done, go back to Apple Music to check if the problem is solved.
7. Relogin Your Apple ID.
Another way to solve this issue on Apple Music is to re-login your Apple ID.
This should force Apple Music and other system apps to reload your data, ensuring everything is downloaded properly.
See the steps below to sign out your Apple ID:
- Open Settings on your iPhone.
- Tap on your Apple ID on the topmost part of settings.
- Now, scroll down and tap on Sign Out.
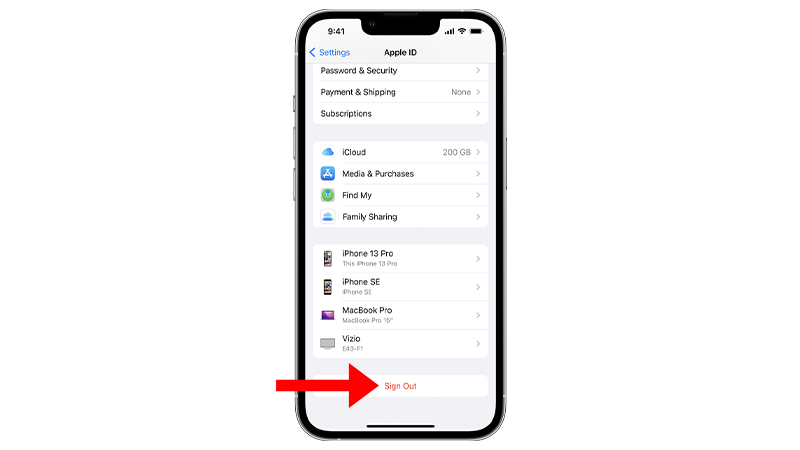
- Follow the prompts to continue.
- After 2-3 minutes, sign in to your Apple ID.
Open Apple Music and see if you still have greyed out songs.
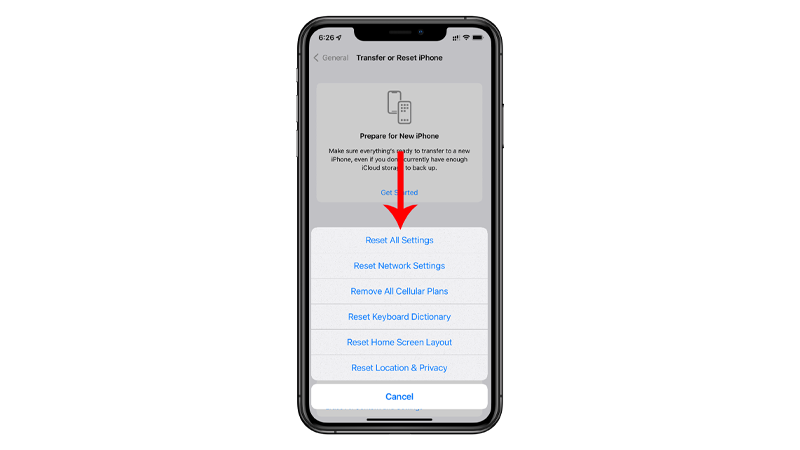
8. Reset Your Settings.
Some of your system settings could be conflicting, preventing Apple Music from syncing your songs.
To rule this out, reset your device’s settings to ensure everything is in order. This is much faster than finding the problematic setting from your iPhone or iPad.
Here’s what you need to do:
- On your iPhone, go to the main menu and open Settings.
- Now, tap on General.
- Look for Transfer or Reset iPhone and tap on it.
- Tap the Reset option and select Reset All Settings.
- Follow the prompts to continue.
Note
- Your iPhone will immediately restart upon resetting your configurations.
- It may appear to be stuck in the Apple logo. Wait for the process to complete, which usually takes 5 to 10 minutes.
Once done, go back to Apple Music to check if the problem is solved.
That ends our guide for fixing greyed out Apple Music songs on your iPhone or iPad. If you have questions, drop a comment below, and we’ll do our best to answer them.