
So you’re trying to install an important Windows update, but then you receive error code 8020002E? Now what?
Windows is a great operating system. Most applications are designed to be run on Windows unlike other operating systems, such as macOS. Unfortunately, Windows isn’t always perfect and has led users down a road of tough situations.
One tough situation is trying to update Windows. Whenever there is a Windows update, it may feel like a gamble. A gamble of whether or not Windows will update instead of outputting an error.
An example of a common error is ‘Windows Update error code 8020002E’. Multiple Windows users have complained about receiving this error. But what does this error mean?
If you’ve received error code 8020002E, then it could mean a variety of things. Examples include a corrupt Windows Update file, a strict antivirus blocking Windows from updating, or Windows Update becoming stuck in a ‘frozen’ state.
Since keeping Windows up to date is important, today we will show you how to fix the ‘Windows Update error code 8020002E’ on your machine. The methods we will provide you with today have been thoroughly tested by us and many other users. Therefore, they are guaranteed to work! We will also include pictures, that way you can easily follow along. 🙂
Let us begin!
- Running the Windows Update Troubleshooter
- Temporarily Disabling Your Antivirus
- Disconnecting from a Proxy Server and VPN
- Resetting the Windows Update Component
- Running a System File Checker Scan
- Install the Update Through Clean Boot
1. Running the Windows Update Troubleshooter.
Sometimes the easiest way in fixing issues with Windows is using the built-in Windows troubleshooter. The Windows Troubleshooter is capable of fixing many of Windows services. Examples include Windows Update, internet, audio, printers, and Bluetooth.
Therefore, the first fix we should try is using the Windows Troubleshooter. This may just be the only solution required to fix the ‘Windows Update error code 8020002E’! 😀
To launch Windows Troubleshooter, simply follow the following steps below:
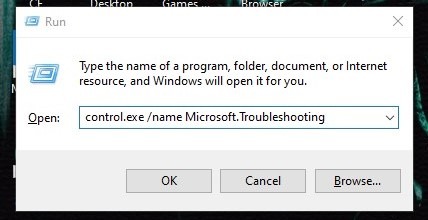
- On your computer, press Windows Key + R. This will bring up the Run Dialogue.
- Then, type in ‘control.exe /name Microsoft.Troubleshooting’ and press the Enter key (as shown below).
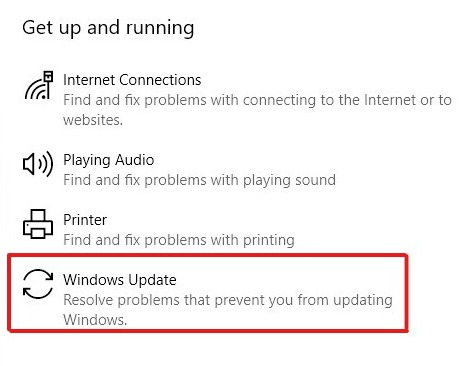
3. Once the Windows Troubleshooter appears on your screen, you should see Windows Update under Get up and running. Simply click on Windows Update. Then, click on Run the troubleshooter.
Note ⚠️
If you are on Windows 7 or Windows 8, then you should see Fix problems with Windows Update under System and Security instead. Therefore, click on Fix problems with Windows Update.
Now the Windows Update troubleshooter window should appear. Simply let it run. If it finds any issues with Windows Update, then the troubleshooter will fix them for you automatically.
If the troubleshooter found an error, then great! It probably detected the ‘Windows Update error code 8020002E’ we have been trying to troubleshoot for. Now go back and try to install the Windows update again.
If the Windows Troubleshooter did not find any issues with Windows Update, then proceed to the next step.
2. Temporarily Disabling Your Antivirus.
Antivirus software is a great source of protection against harmful software, websites, and other services.
Most Windows machines require them, as Windows constantly has issues with malware and other sorts of viruses. Windows even has a built-in antivirus called ‘Windows Defender’.
However, sometimes antivirus software can get in the way and prevent certain applications from working properly.
That’s where Windows Update comes in. Some users have reported that their antivirus software had prevented Windows from updating their machines.
So we should try temporarily disabling our antivirus, and then try to install the Windows update. Depending on what antivirus you may have, there are different steps for each antivirus.
If you don’t have any antivirus and just use Windows Defender, then follow the following steps below to temporarily disable it:
- On your computer, press Windows Key + S. This will bring up the Search Dialogue.
- Then, type in ‘Windows Security’ and press the Enter key (as shown below).

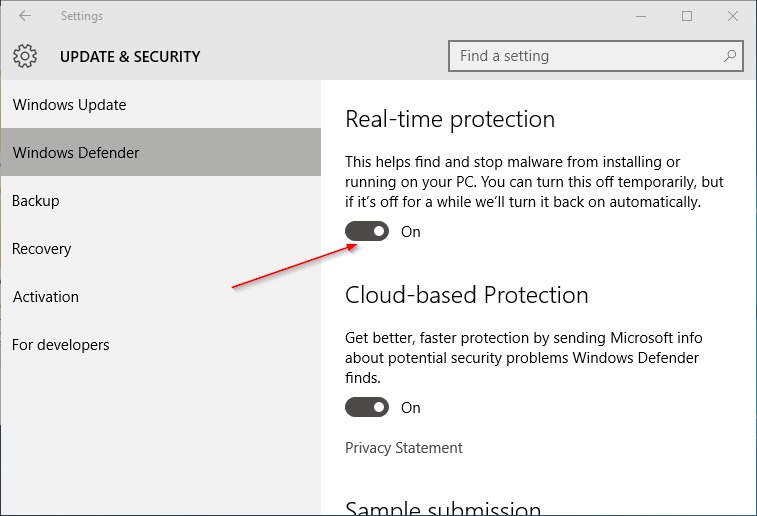
3. Once Windows Defender opens, click on Virus & threat protection on the left side of the application.
4. Then, click on the button under Real-time protection to disable Windows Defender.
Now that Windows Defender is disabled, try installing the Windows update again.
If you were able to update Windows, then you may now re-enable Windows Defender following the same method above.
If you use your own antivirus instead, then they’re different steps for each antivirus.
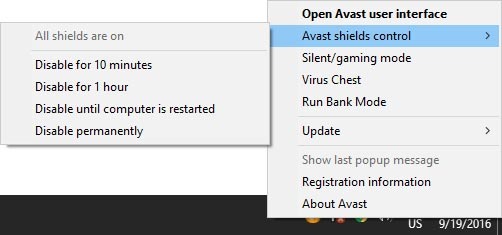
Here is a common method, that works for most antivirus software, in disabling your antivirus:
- Go to the bottom right of your taskbar where the System Clock is located.
- Then, Right-Click your antivirus. From there you should see a Disable button.
- Now, click on the Disable button (as shown below).
If your antivirus didn’t give you an option to disable it, then you could try googling how to disable your specific antivirus. But most antivirus software (Avast, AVG, Norton, ESET, and so forth) can be disabled this way.
Now that you’ve disabled your antivirus, try updating Windows again. After updating Windows, you may re-enable your antivirus. To re-enable it, follow the same method provided above. Instead of disabling it, you should have an option to re-enable your antivirus.
3. Disconnecting from a Proxy Server and VPN.
If you are connected to a proxy server and/or VPN, then perhaps this could be preventing you from installing Windows updates.
The reason for this may have to do with an insecure proxy server or VPN, or slow connection.
So we should try disconnecting from our proxy server and/or VPN if we are connected to one.
First, we will discuss how to disconnect from a proxy server.
This method here is guaranteed to work for Windows 7, Windows 8, and of course Windows 10:
- Go to the bottom left of your taskbar and click on the Windows logo.
- Then, type in ‘Control Panel’ (as shown below).
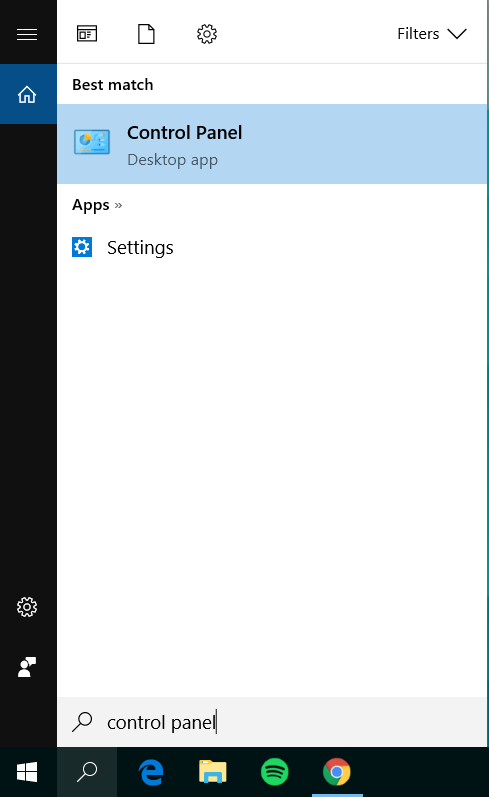
3. Next, click on Control Panel.
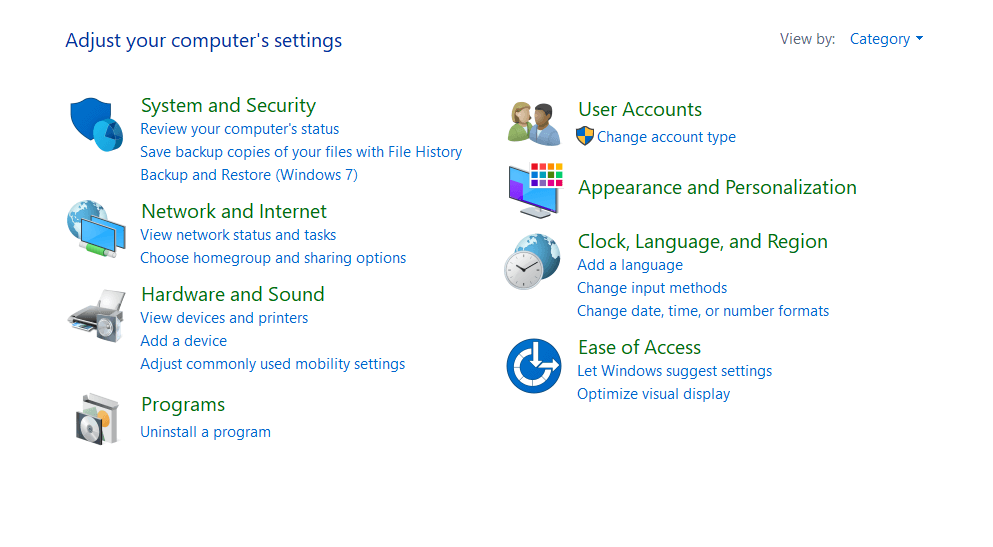
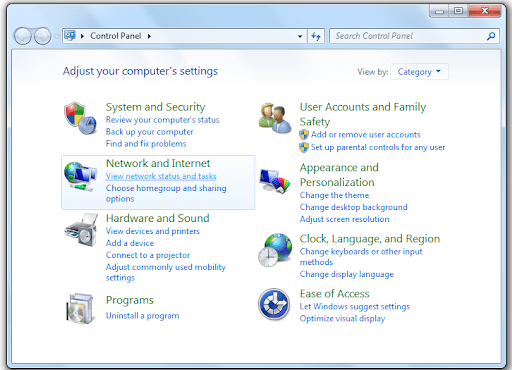
4. The Control Panel menu should now appear. At the very top left of the list, click on Network and Internet.
Note ⚠️
If you do not see Network and Internet, then just skip Step 4 and move on to Step 5.
5. Now click on Internet Options. It should be the second item in the list.
6. Once the popup appears, click on the Connections tab.
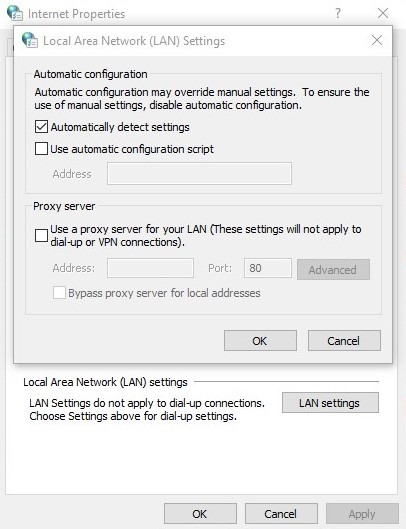
7. Next, click on the LAN settings button near the bottom of the tab.
8. If Use a proxy server for your LAN checkbox is checked, uncheck it.
Now that you have temporarily disconnected from your proxy server, try updating Windows again. If Windows updates now, great!
After Windows has updated, you can now enable your proxy again following the same steps above. However, instead of disabling it, you would be re-enabling it.
Now we will show you how to disconnect from a VPN if you’re connected to one:
If you are on Windows 10
- Go to the bottom left of your taskbar and click on the Windows logo.
- Then, type in ‘Settings’ (as shown below).
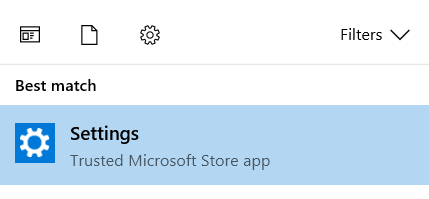
3. Next, click on Settings.
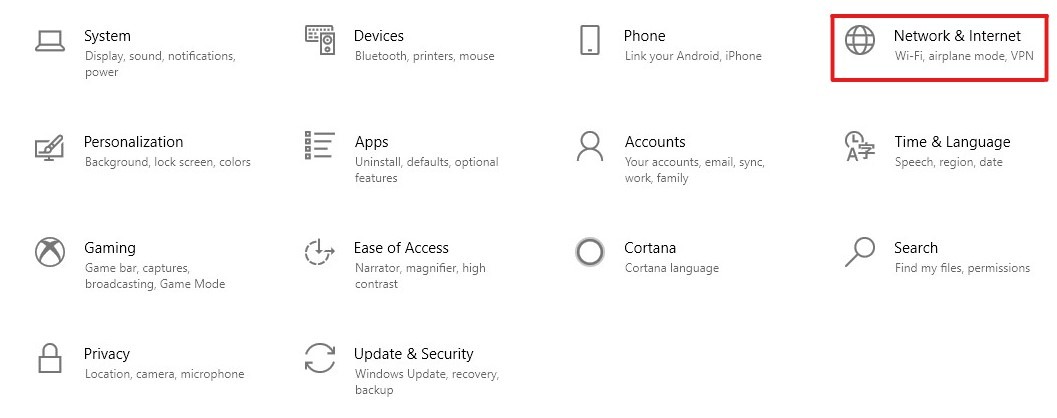
4. The Settings application should now be visible. At the very top right of the list, click on Network & Internet.
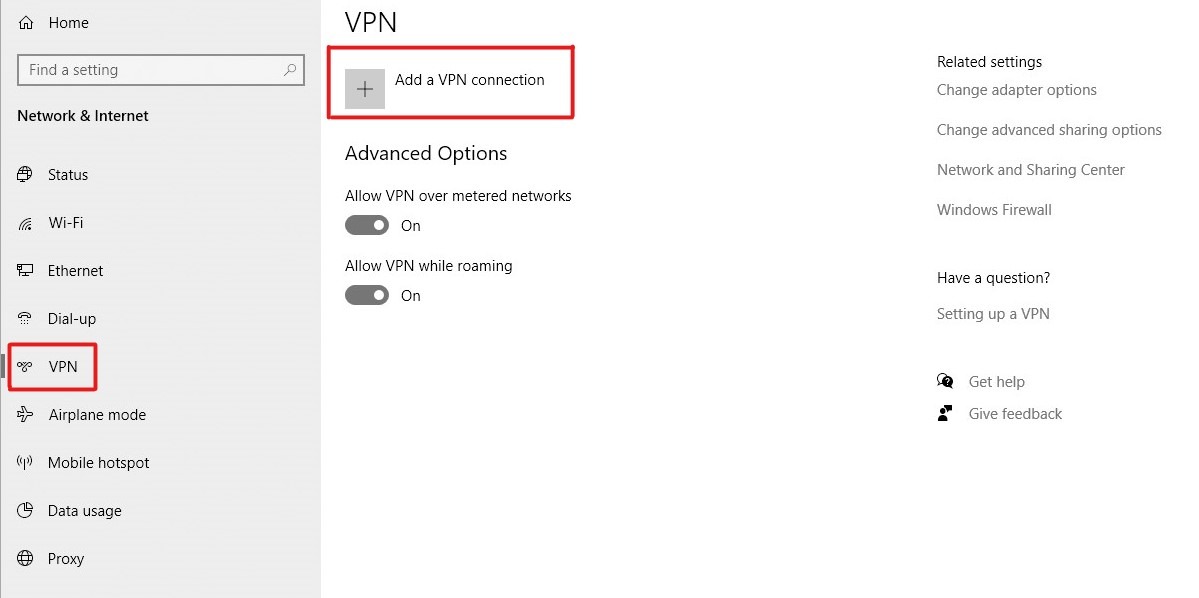
5. On the left-hand side, click on VPN.
6. Then, click on your VPN.
7. Lastly, click on the Remove button.
After removing your VPN, you will now be disconnected from it. Now try to update Windows again. If you were successful in updating Windows, then you can now re-add your VPN by following the same steps before. However, this time you will click on Add a VPN connection instead and then add your VPN back.
If you are on Windows 7 or 8
- Go to the bottom left of your taskbar and click on the Windows logo.
- Then, type in ‘Control Panel’ (as shown below).
3. Next, click on Control Panel.
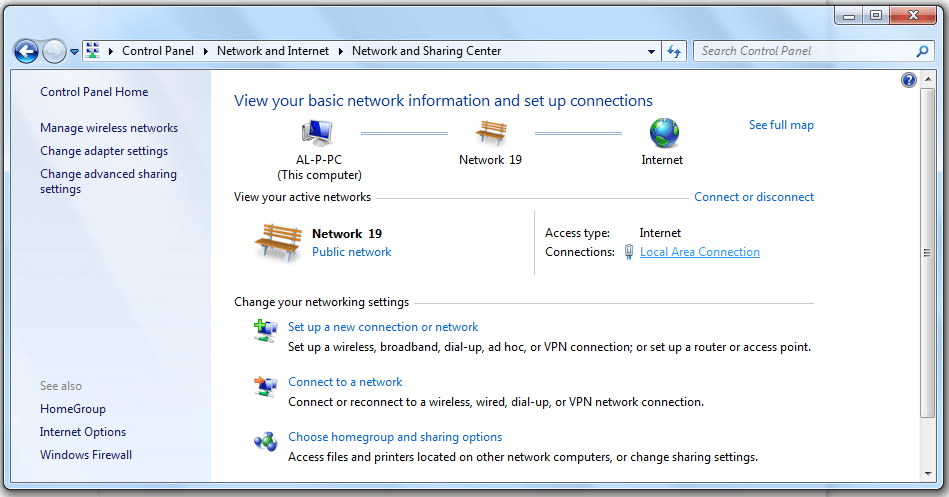
4. The Control Panel menu should now appear. At the very top left of the list, click on View network status and tasks under Network and Internet.
Note ⚠️
If you do not see Network and Internet, then click on Network and Sharing Center instead.
5. Now click on Connect or disconnect. From here you will be able to disconnect from your VPN.
Once you have removed your VPN, you will be disconnected from it. Now try to update Windows again. If you were successful in updating Windows, then you can now re-add your VPN by following the same steps before. However, this time you will click on Setup a new connection or network instead and then add your VPN back.
4. Resetting the Windows Update Component.
If you have tried the other steps above and Windows Update is still giving you the error, then it may have to do with Windows Update being corrupted.
Luckily, we can easily fix Windows Update with a few commands in the Windows Command Prompt.
Here’s how you can fix Windows Update using Windows Command Prompt:
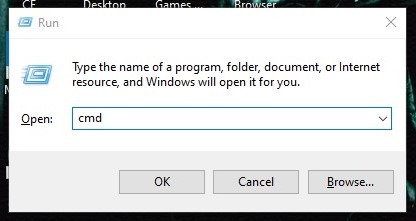
- On your computer, press Windows Key + R. This will bring up the Run Dialogue.
- Then, type in ‘cmd’ and press the Enter key (as shown below).
3. Once you’re in the Windows Command Prompt, type in the following commands in the same order and press the Enter key:
net stop wuauserv
net stop cryptSvc
net stop bits
net stop msiserver
Note ⚠️
Typing in these commands will stop the Windows Update services, Cryptographic services, BIT services, and the MSI services from running. This is a crucial step in fixing the corrupted Windows Update files.
4. After disabling those services, type in these following commands within the Windows Command Prompt and press the Enter key:
ren C:\Windows\SoftwareDistribution SoftwareDistribution.old
ren C:\Windows\System32\catroot2 Catroot2.old
Note ⚠️
The two files you renamed are used by Windows Update when updating your machine. These two files could then be possibly corrupted. Since these two files are used by the operating system, you can’t just delete them. Therefore, we are renaming them. After renaming them, Windows will make new versions of the files.
5. Once you have renamed those two files, we can now restart all the services we stopped earlier with the following commands:
net start wuauserv
net start cryptSvc
net start bits
net start msiserver
After fixing the potentially corrupted files used by Windows Update, try installing the Windows updates again.
Windows Update still outputting the error code? Then, proceed to the next step.
5. Running a System File Checker Scan.
If you have tried every other method so far above, and Windows Update is still broken for you, then all hope isn’t lost! There may be other corrupted files, on your machine, that is preventing Windows Update from installing updates. 🙂
Thankfully, Windows has a built-in tool when it comes to checking your hard disk for errors.
This built-in tool is the ‘Windows System File Checker’, also known as SFC for short. SFC can detect corrupted files on your hard disk and repair them for you. Useful right?
Therefore, we will be using it today to potentially fix Windows Update and allow it to install updates.
To run an SFC scan on your machine, follow the following steps below:
- On your computer, press Windows Key + R. This will bring up the Run Dialogue.
- Then, type in ‘cmd’ and press Ctrl + Shift + Enter (as shown below).
3. Once Windows Command Prompt opens as Administrator, type in the following command and press the Enter key:
sfc /scannow
Note ⚠️
When running an SFC scan, Windows will replace corrupted files with non-corrupted versions of them. This way the files will no longer be corrupted. Since this command will actively search your machine and replace system files, it is advised to not interrupt the service at all when it is running (such as shutting off your computer). Doing so could potentially corrupt more files on your machine, or corrupt Windows in general.
4. After running the SFC scan, simply Restart your computer. After your computer restarts, do what was done in steps 1 and 2 again.
5. Now that you have re-opened the Windows Command Prompt as an Administrator, type in ‘DISM /Online /Cleanup-Image / RestoreHealth’ and press the Enter key.
Note ⚠️
When running DISM, it will connect to the internet. So if you have a slow connection, it may take a while to finish running the command.
6. Once DISM has finished running, Restart your computer one last time.
After your computer has finished restarting again, check to see if Windows is capable of installing updates again.
If Windows is still unable to install updates due to the ‘Windows Update error code 8020002E’, then proceed to the next step.
6. Install the Update Through Clean Boot.
After trying every other method listed in this article, it may seem like you’ve hit a dead in. But not necessarily!
Perhaps the reason why Windows Update won’t update still has to do with conflicting applications and services running on startup.
For instance, these applications and services may be accessing files Windows Update is trying to update.
So in order to allow Windows Update to update your machine, we may need to disable the application or service that is the culprit of the issue.
Since tons of applications and services run on startup, we will need to run a clean boot on Windows. When running a clean boot on Windows, it will disable all startup programs and services, and run with the minimal drivers required in order to run Windows safely. So if any application or service was causing the ‘Windows Update error code 8020002E’, then now it should go away. 😀

Follow this guide in order to go into a clean boot. Once you’ve started your computer in clean boot, attempt to update Windows again.
This wraps up our guide on how to fix ‘Windows Update error code 8020002E’. If you know of any other solutions that were not mentioned in this article, then graciously share them in the comment section below. Once we were to update this article again, you would be credited for your feedback.
If you still have questions, after reading this article, then please feel free to leave a comment below! 😄
If this guide helped you, please share it. 🙂