


There are many reasons why you may choose to downgrade iOS 13 Back to iOS 12.4.1.
Whether it is that iOS 13 with its constant new updates every day (iOS 13.1, 13.1.1, 13.1.2) is filled with little bugs that may be of a nuisance or iOS 13’s new features just isn’t for you or maybe even you feel iOS 12.4.1 was already better and Apple had gone onto ruin it further with features that make it harder to use and feels slower.
For whatever reason, you may have for downgrading iOS 13, just know that you always have the option to do what you want to do, with your device.
Even if Apple doesn’t make that process easy for you.
In this guide, I’ll help you you step-by-step on how to downgrade from iOS 13 to iOS 12.4.1 for your iPhone.
Let’s dive right in.
How to Downgrade iOS 13 Back To iOS 12.4.1: 5 Steps
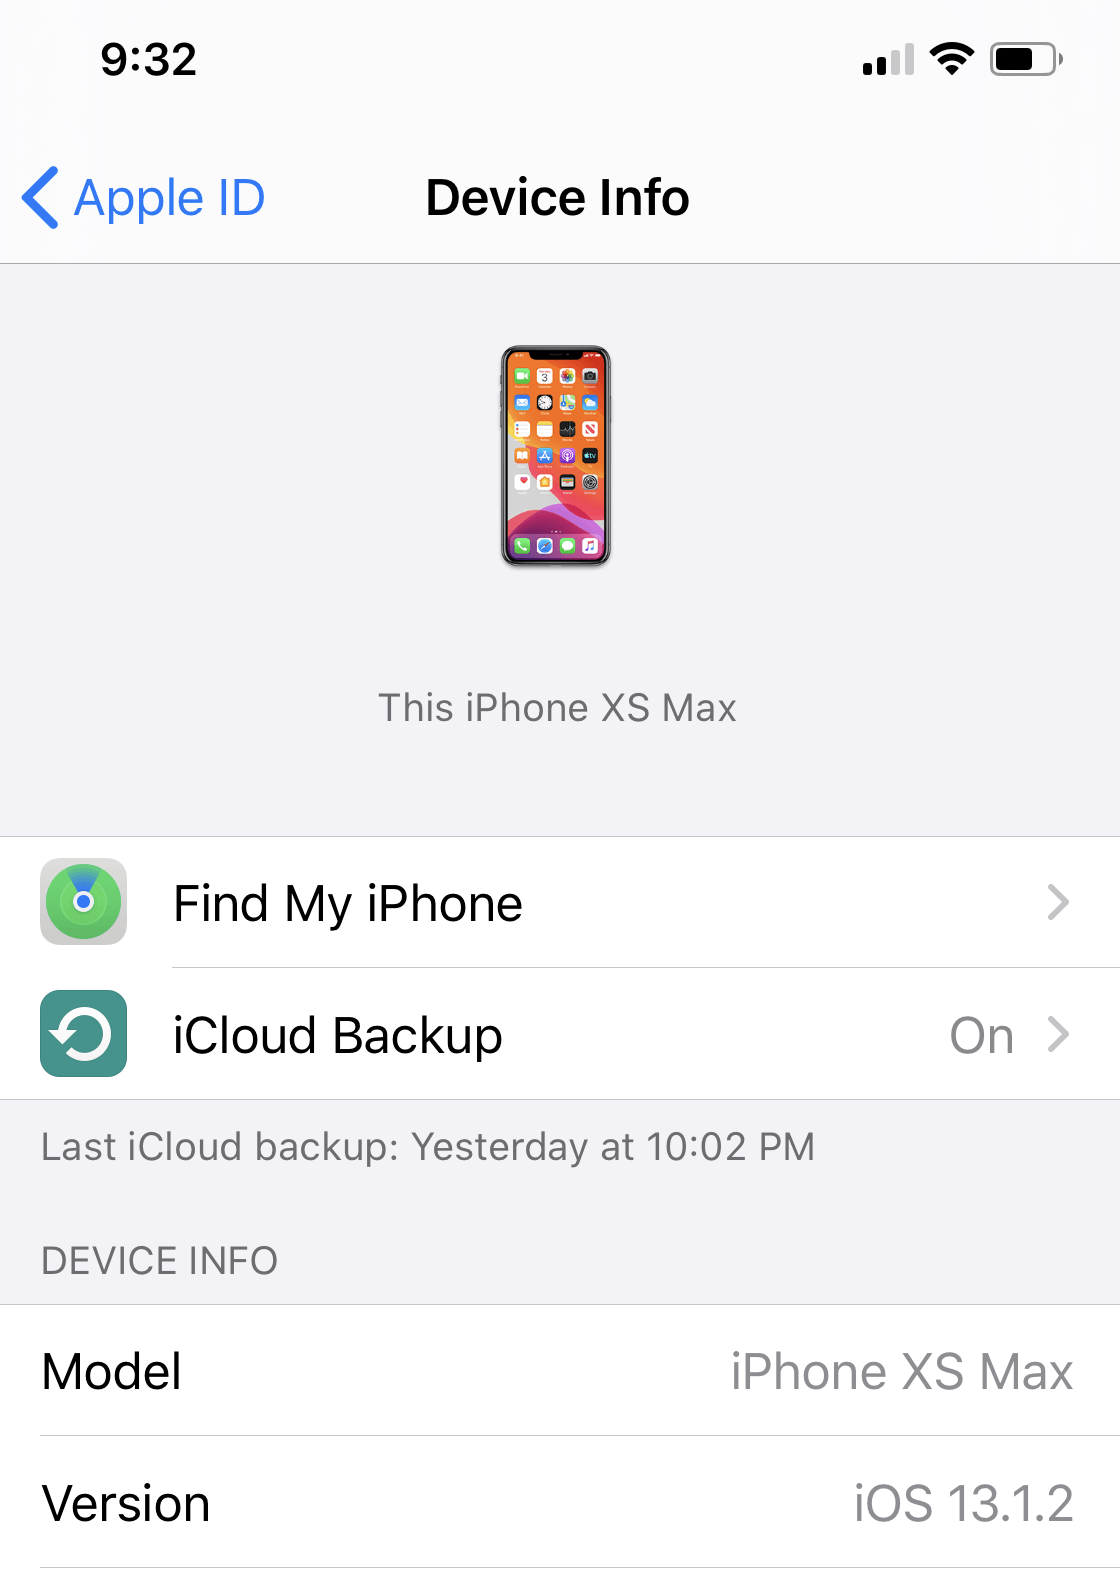
Step 1: Disable Your ‘Find My iPhone’ on iOS 13.
The first things first, you’ll need to disable your Find My iPhone feature on your iPhone.
Previously we did not have this step in any of our previous guides on downgrading iOS since iOS will prompt you automatically to disable the feature before you downgrade it — but for the purposes of this guide, it’s best to have things under your control and for one having this option turned off from the start prevents a lot of issues from happening later.
It’s super simple to turn the feature off. Here’s how you do it:
- Jump into your Settings app and then tap on your Apple profile (at the top) and then choose the Find My from the list.
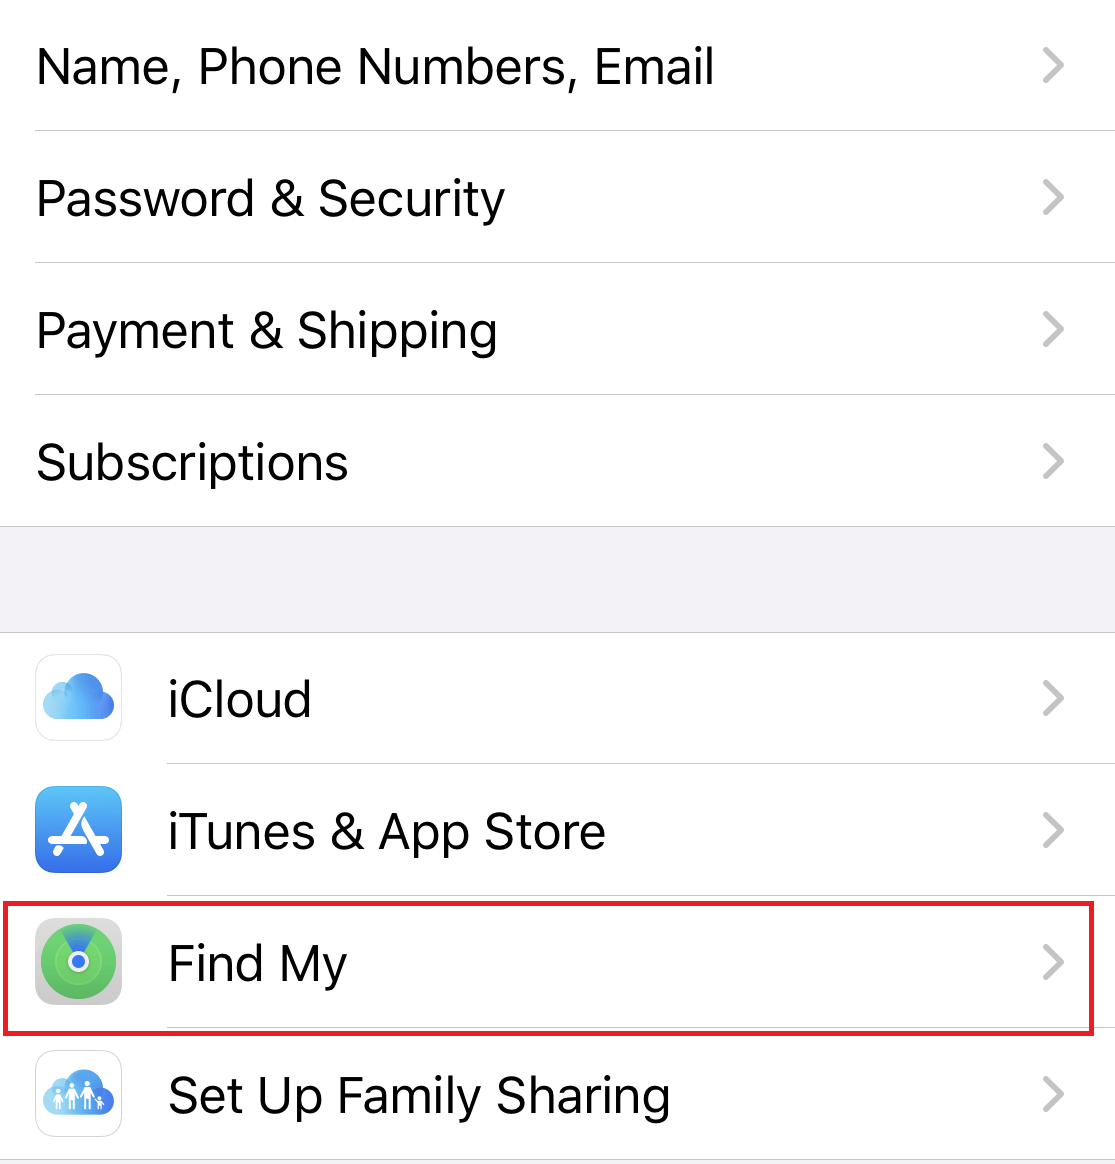
- Next, simply tap on the option Find My iPhone, this brings you to a new page.
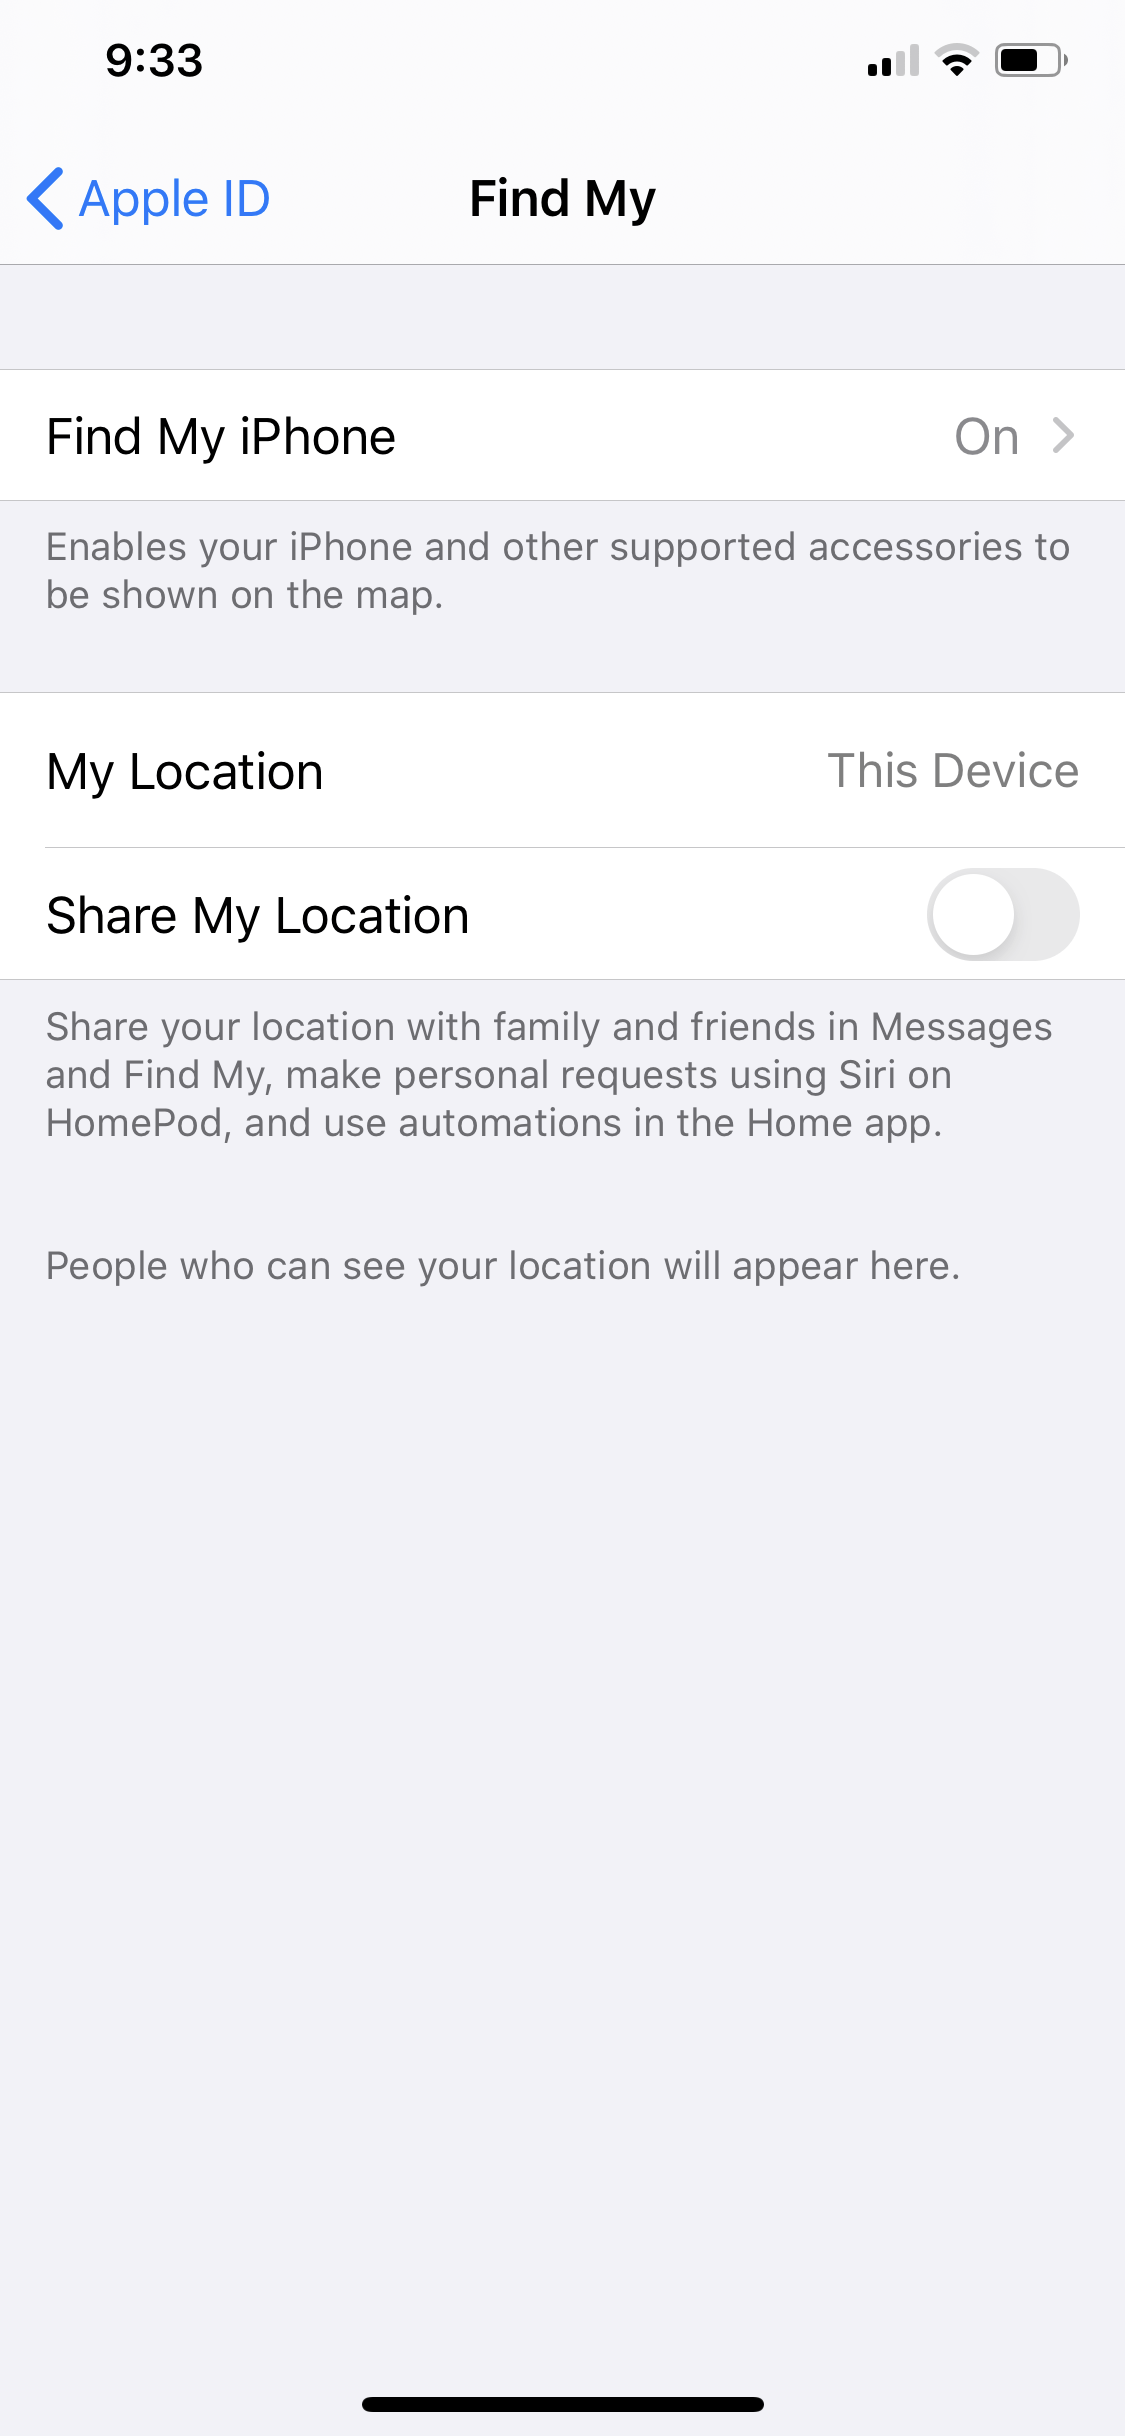
- On this page, toggle the Find my iPhone option off.
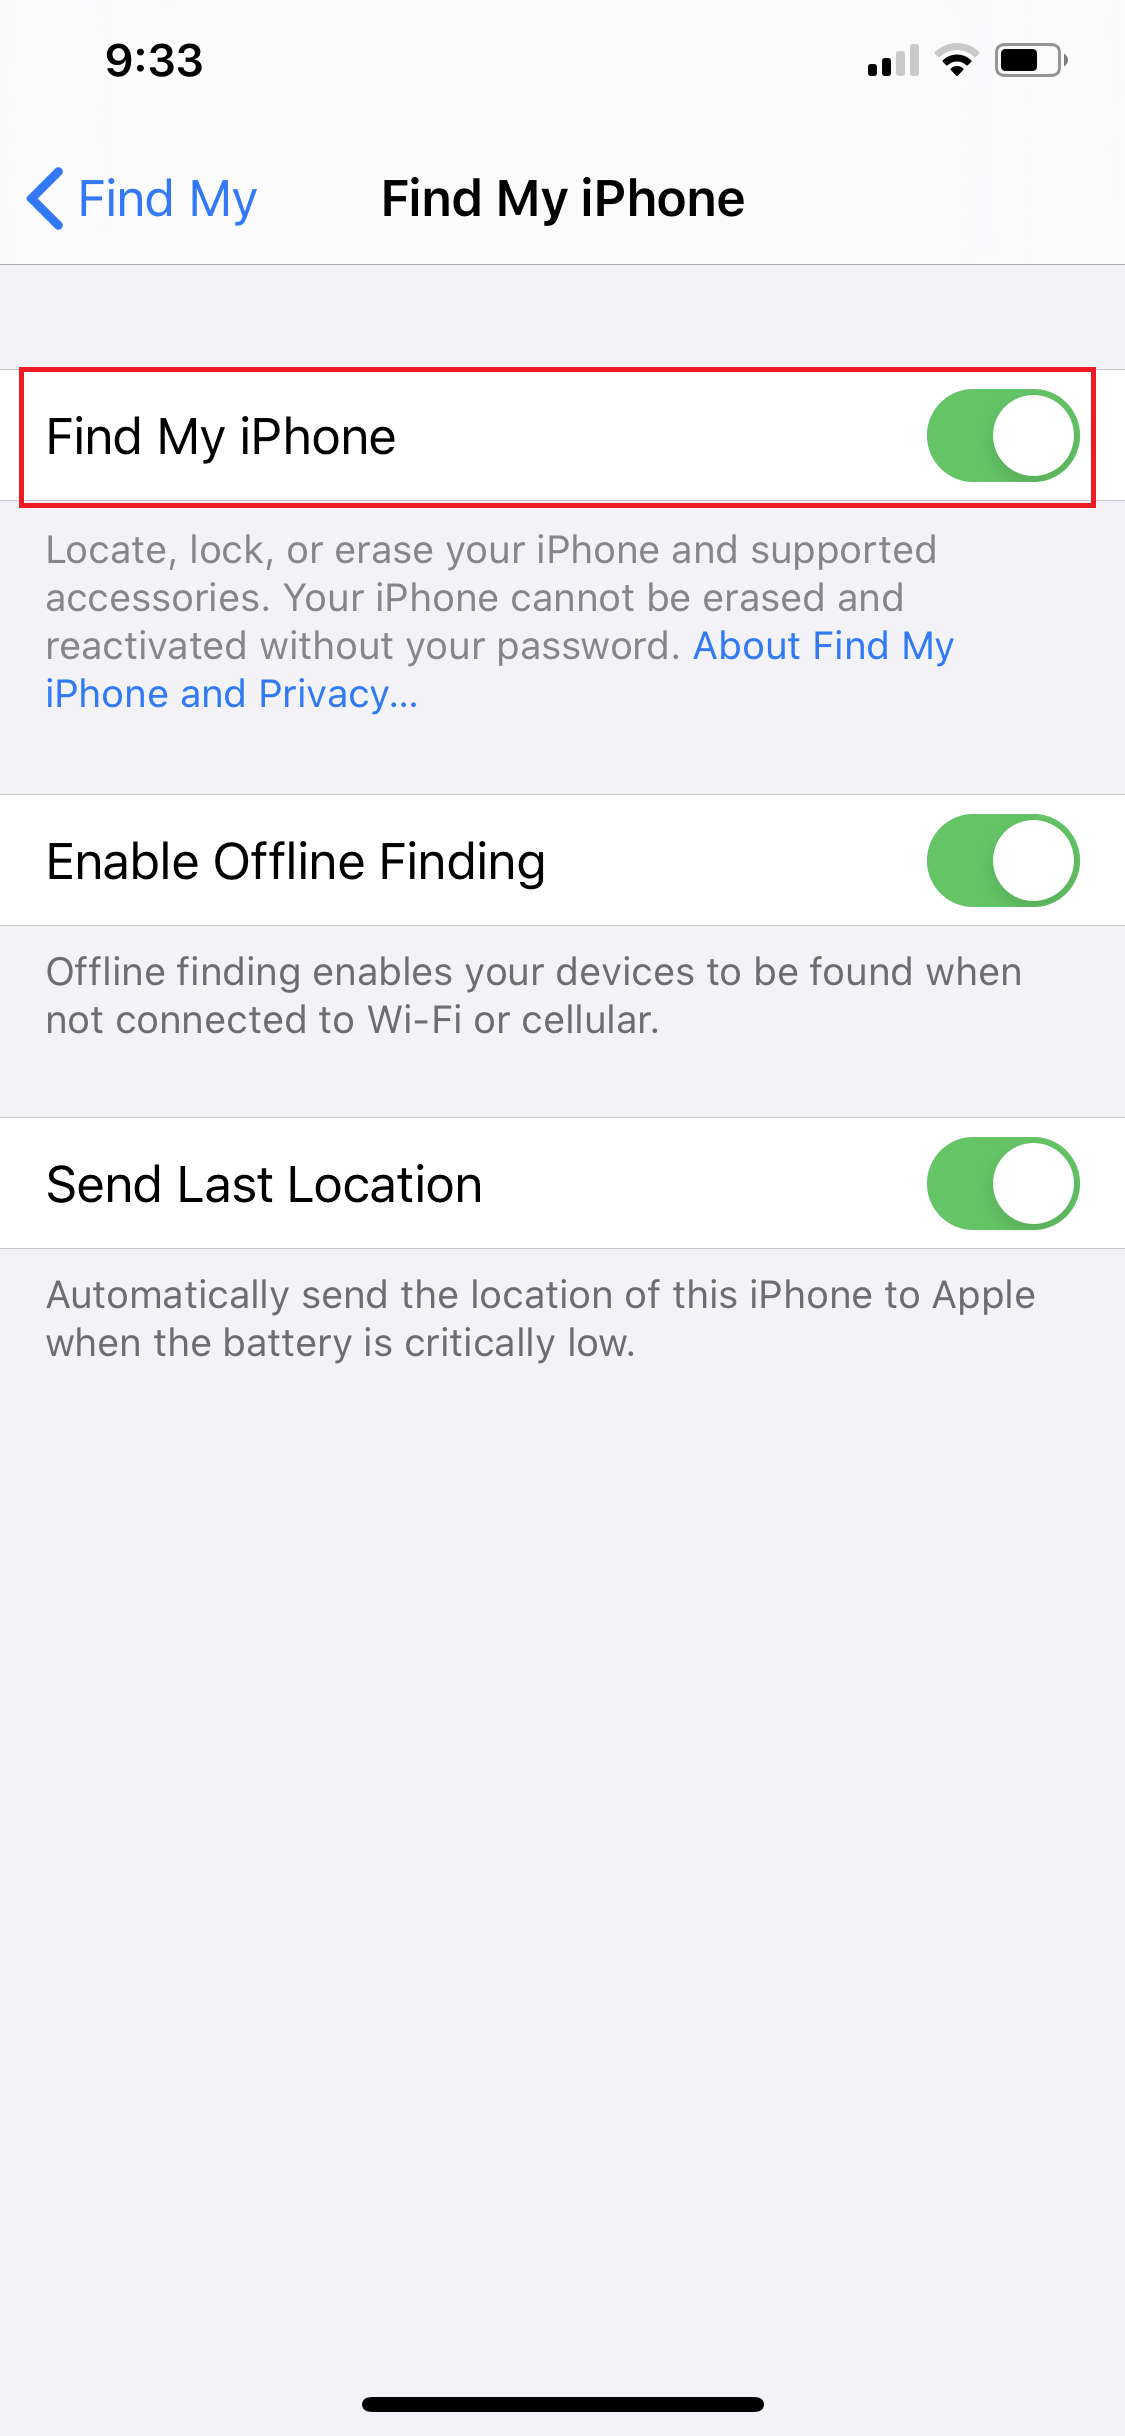
- You will be prompted to re-enter your Apple ID and password. Enter your details and then iOS will proceed to disable Find My iPhone on your device.
Now that is done, let’s get on with the juicy stuff 🥤 which is downloading our iOS 12.1.4 file.
Step 2: Download the iOS 12.4.1 Restore Image
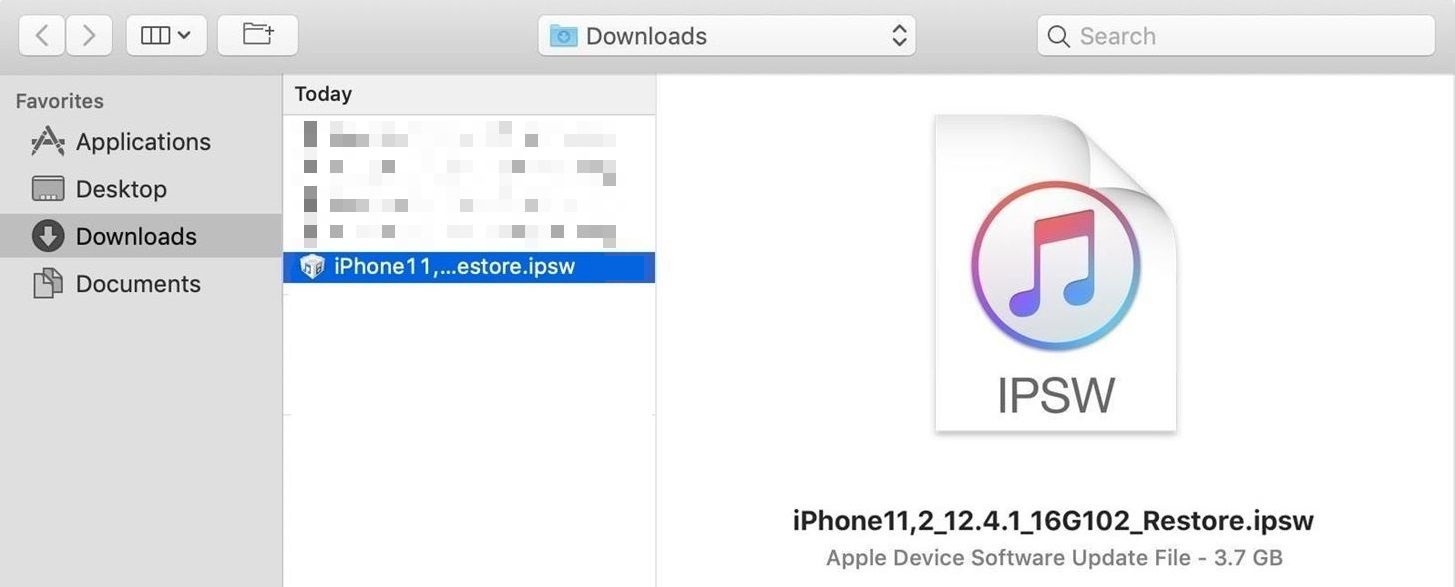
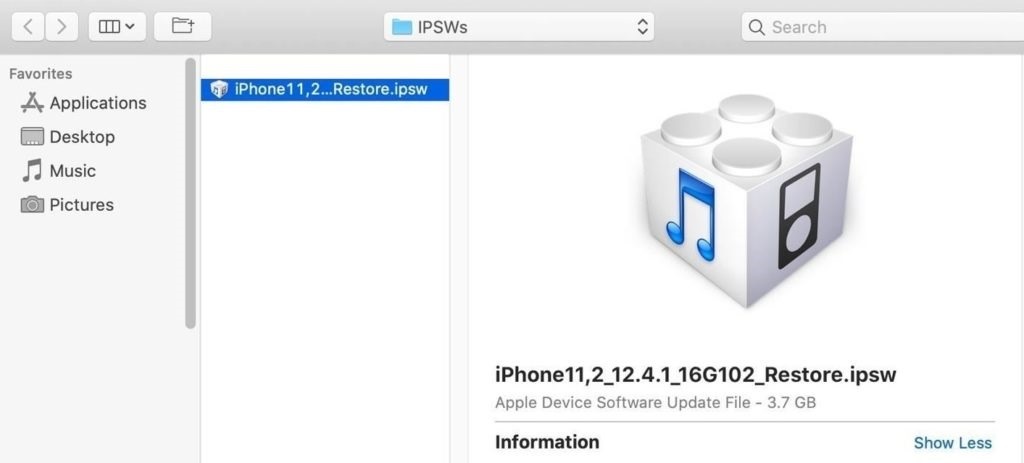
Jump onto your Mac or your Windows computer and then proceed to download the restore image for your specific iPhone model for iOS 12.4.1. This will be an IPSW file.
Why do you need this file? Well, this little file is what will be helping you downgrade back to iOS 12.4.1 but it only works if you download the file that is specific to your iPhone model. You can identify your iPhone model by going into your Settings > Your Apple Profile (top) > Your Device Model
Unfortunately, since Apple stopped allowing the previous version of iOS 12 such as iOS 12.3, 12.3.1, 12.3.2, 12.4, hence the only iOS version you’ll have to downgrade to is iOS 12.4.1.
Do remember that these files range anywhere from 500MB to 2GB and above hence the download time will take some time.
iOS 12.4.1 Restore Images for iPhone, iPad and iPod Touch.
- iPhone XS Max
- iPhone XS
- iPhone XR
- iPhone X
- iPhone 8
- iPhone 8 Plus
- iPhone 7
- iPhone 7 Plus
- iPhone 6s
- iPhone 6s Plus
- iPhone SE
- 12.9-inch iPad Pro (3rd generation)
- 12.9-inch iPad Pro (2nd generation)
- 12.9-inch iPad Pro (1st generation)
- 11-inch iPad Pro
- 10.5-inch iPad Pro
- 9.7-inch iPad Pro
- 9.7-inch iPad (6th generation)
- 9.7-inch iPad (5th generation)
- iPad Air (3rd generation)
- iPad Air 2
- iPad mini (5th generation)
- iPad mini 4
- iPad mini 3
Step 3: Open Up iTunes or Finder on Your Mac (or PC).
Once the image file for iOS 12.4.1 has entirely downloaded, the next step is to grab your iPhone and plug the iPhone into your Mac or your Windows computer using your charging cable.
If you’re using a Windows or macOS 10.14.6 Mojave or any lower macOS versions, then iTunes should open up automatically the moment you plug in your iPhone. However in the event where iTunes does not open up automatically, simply look it up using either Finder (if you’re on Mac) or Search (if you’re on Windows) and then click to open it.
If you’re running macOS 10.15 Catalina on your Mac, then you should be able to see that your iPhone will appear as a regular drive under Finder > Locations.
Help! iPhone is not appearing on iTunes.
If you’re on Windows or macOS Mojave or any lower versions and you find that iTunes either didn’t open right away as you plugged in your iPhone or that your iPhone didn’t appear in iTunes, then simply take a look at your iPhone’s lock screen. You should be able to find an Unlock iPhone to Use Accessories notification. Simply go through it and Trust this Computer to allow your computer to access the iPhone. From there, just follow the on-screen instructions then proceed to follow the below steps.
If you’re on Windows or macOS Mojave10.14.6 or lower, once connected to iTunes here’s what you do:
- On the page, make sure that the phone icon is present on the top menu bar next to the dropdown box. You should also see your iPhone under Devices below too (left sidebar).

- Simply click on either to go into your iPhone’s Summary screen. The next step will be under Step 4.
If you’re on macOS Catalina 10.15 or above, once connected, here’s what you do.
- Simply jump into Finder and look for under the Locations section (sidebar) for your iPhone.
- Click on your iPhone. You may also double-click on the iPhone right from your desktop. The next step will be under Step 4.
Step 4: The Downgrading.
We will now use the IPSW image file that we had downloaded in Step 1 (above) to downgrade from iOS 13 to iOS 12.4.1.
Here’s what you do:
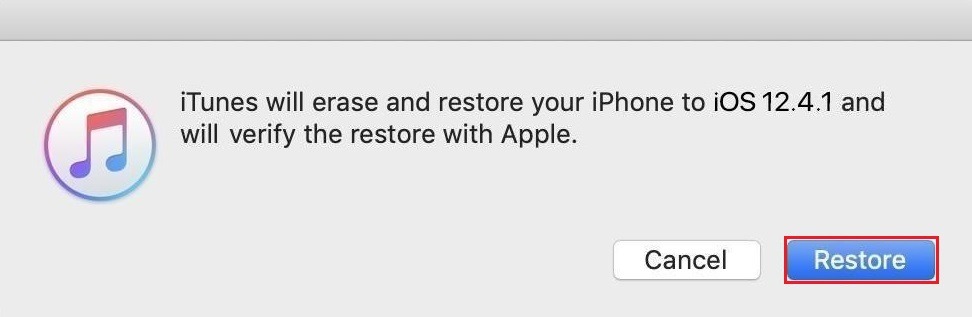
- If you’re on a Mac, simply hold down on your Option key and then on the Summary page in iTunes (macOS Mojave or lower) or Finder (macOS Catalina and later) click to Restore iPhone. If you’re on a Windows Computer, simply hold down your Shift key and then on the Summary page in iTunes, hit the Restore iPhone button.
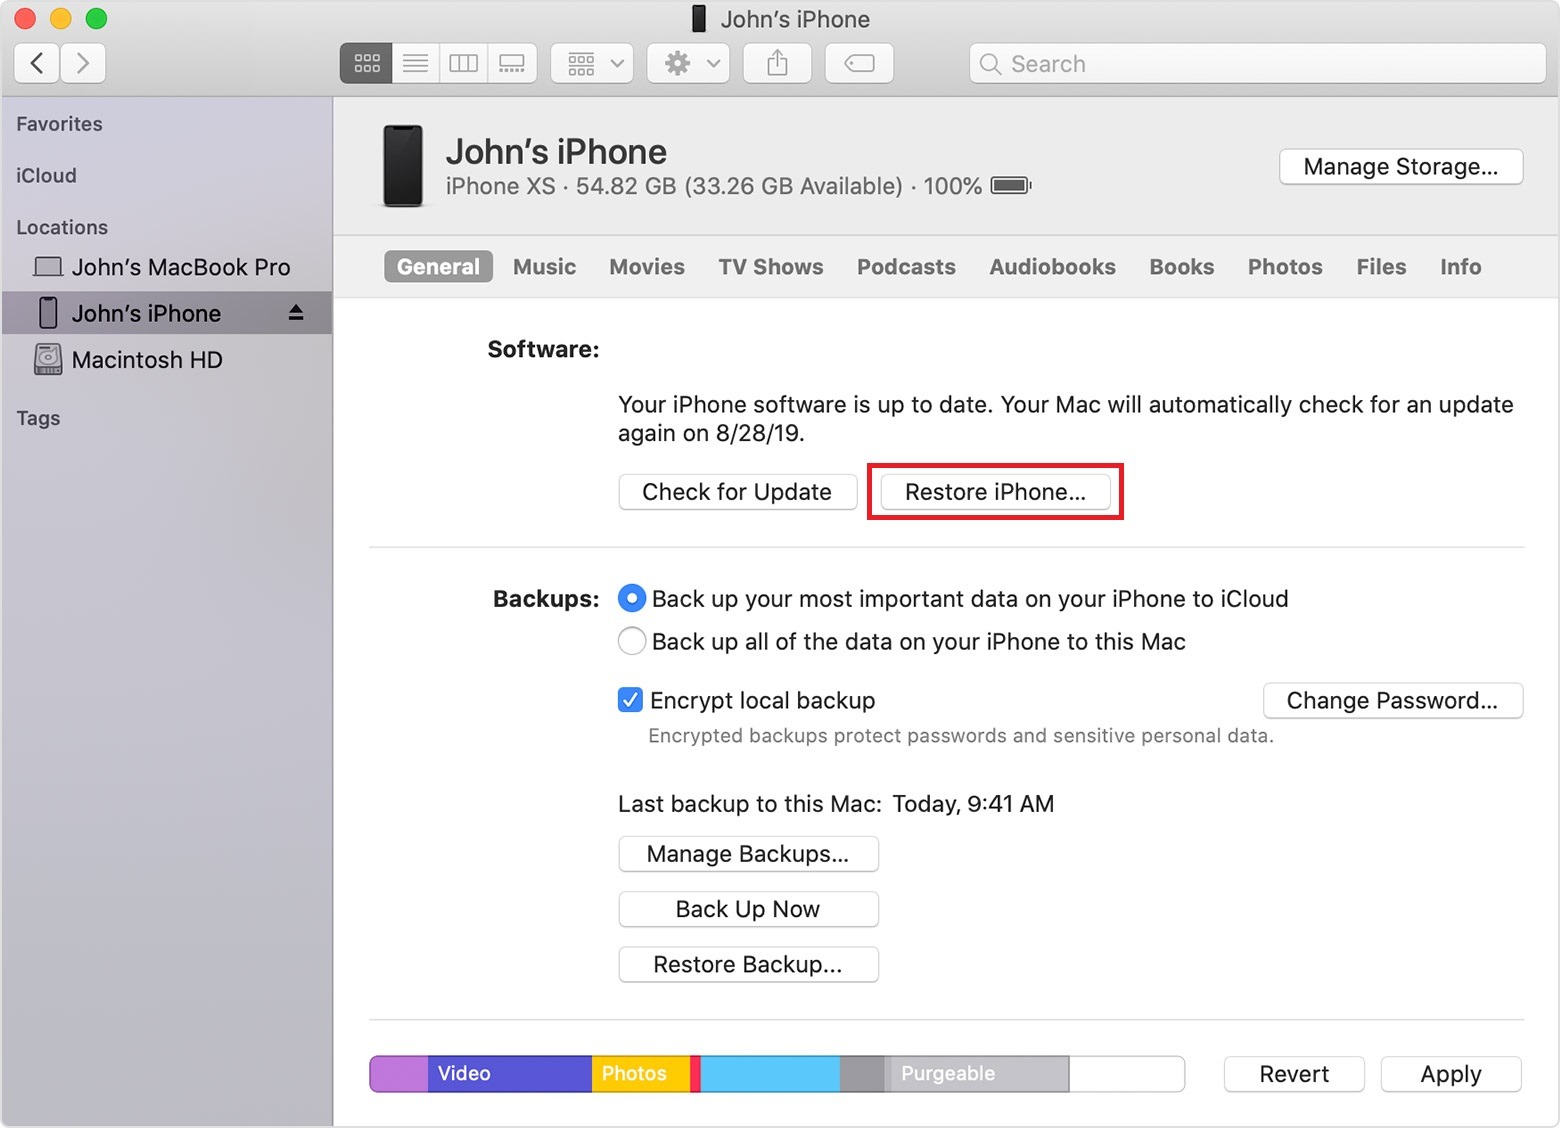
- Awesome. Next, you’ll find that the file browser will pop up on your Mac or your Windows. Simply choose the IPSW file that you had downloaded earlier and click it. Hit the blue Open button (bottom right).
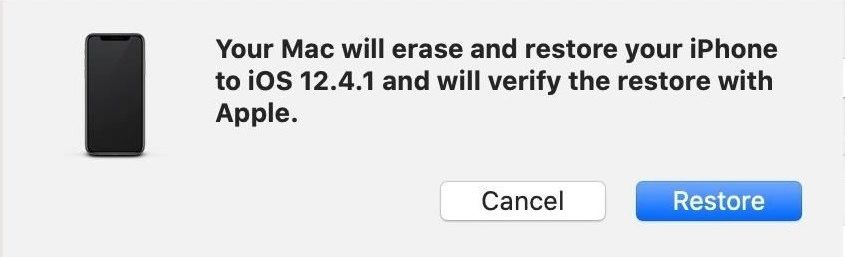
- Lastly, you’ll find a pop up showing you that iTunes or Finder will erase and restore your iPhone to iOS 12.4.1 and will verify the restore with Apple. Meaning, your iPhone will be downgraded from iOS 13 to iOS 12.4.1. Hit the Restore button to proceed with the downgrading process. You will have to enter your iPhone’s passcode during the installation process.
If you’re on Finder, the restore prompt will appear as follows:
Warning ⚠️
Whatever you do, do not unplug your iPhone from your computer until it restarts on its own. Give it a good few minutes and once you’re greeted with the iOS 12.4.1 welcome screen, should you only then disconnect.
Step 5: Restoring Your iPhone.
Finally, we may restore your iPhone from a backup to get back all your data since using a restore image file will mean that all of your iPhone’s data will be erased.
Now there are three ways to go about this:
1. If you made a complete backup when you were initially in iOS 12.4 or 12.4.1 beforehand, then you will be able to get back all your data like how it was prior to updating to iOS 13. Simply tap on Restore from iCloud Backup or Restore from iTunes Backup in this case.
2. If you made a backup in iOS 13 but you’re downgrading to iOS 12.4.1 and wish to regain all of your data, then iOS would simply just update you back to iOS 13 (a complete waste of time). Hence, in this predicament, you’ll have to Set Up as New iPhone.
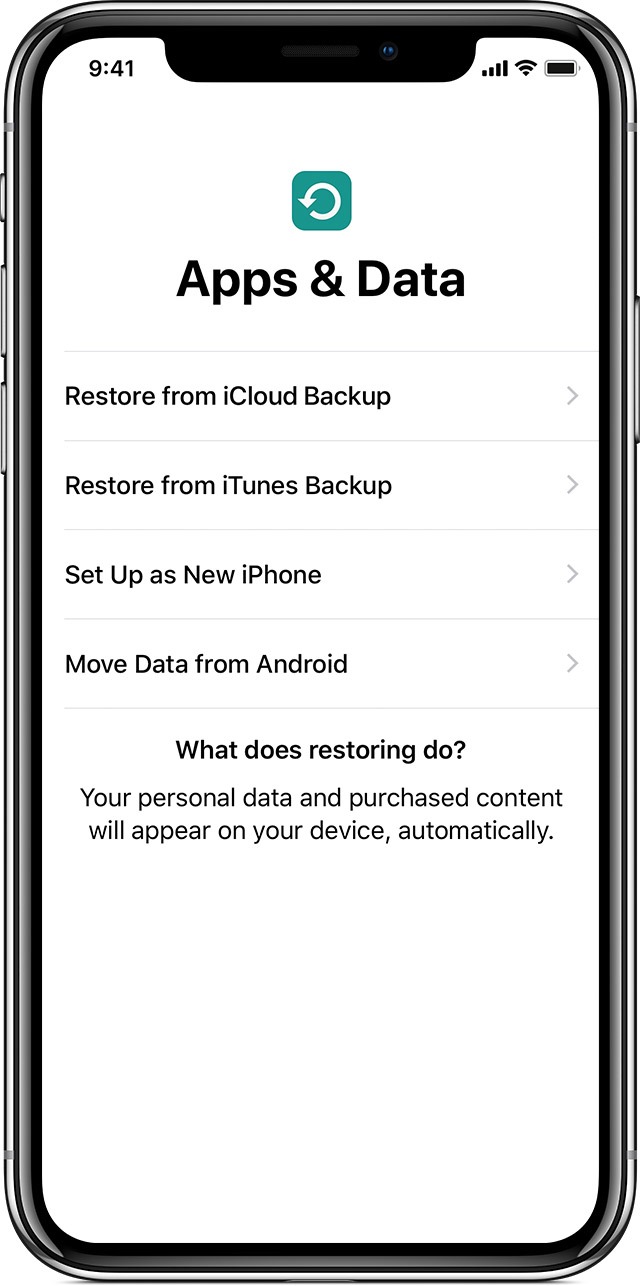
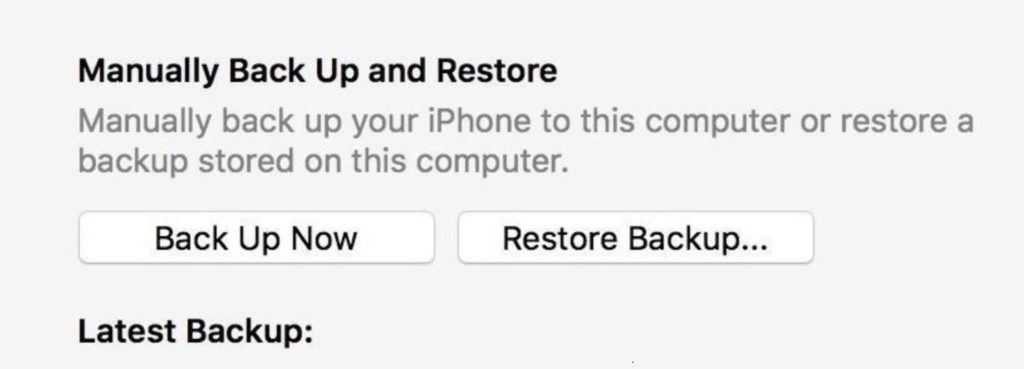
3. If you made an archived backup in iTunes for iOS 12.4 or iOS 12.4.1, then you can reclaim all your data by tapping on Restore from iTunes Backup on your iPhone’s screen. You will need to make sure that you are still connected to iTunes in this case, meaning having your iPhone plugged in 🔌. From your computer, in iTunes > Restore Backup > Select Archived Backup > Restore.
That’s it! ✅ Once the restoration is done, you’ll have your clean and new iOS 12.4.1 on your iPhone, iPad or your iPod Touch.
Feel free to go through the many tips and advice from the many helpful comments posted by others who had the same issue below. 🙂
If this guide was helpful, please share it. 🙂


Does ur phone need to be in recovery mode for this to work? Because when I followed all the steps correctly nothing happened.
I get error 3194 telling me it can not be restored, On the net they say the IOS 12.4.1 is no longer signed and I suppose this is why it does not work?
u cannot downgrade to an unsigned iOS version
Apple stopped signing 12.4.1 last month, as such you will not be able to downgrade to 12.4.1
Do you have the signed copy of 12.4.1 ipsw file with you ? I am unable to downgrade my phone to 12.4.1 from iOS 13. Please help me.
Do these instructions still apply as 01/02/2020 to iOS 13.3?